


GRBLDroid - Documentation
Prerequisites
In order to use GRBLDroid you need :
1) A CNC machine
2) An Arduino Duemillanove / UNO board
3) An Android OTG tablet, preferably using a separate DC power jack
4) An OTG Cable
5) A USB A to B Male/Male Cable
Uploading the GRBL firmware into Arduino board using Arduino GUI.
Download grbl-master.zip from here
Unzip only the grbl folder
Run arduino gui
Hit : Sketch > import library > select the grbl unzipped folder
This will copy the selected folder at
C:\Users\[user]\Documents\Arduino\libraries
Now go to : File > Examples > Grbl > Grbl Upload
Now select
Tools > Board
Tools > Serial port
Hit the upload button
This operation generates a temporary hex file at : (example)
C:\Users\[user]\AppData\Local\Temp\build5690384548105260924.tmp\grblUpload.cpp.hex
using the option : File > Preferences > show verbose at compilation
GRBLDroid is pretty easy to use.
All you need is to install it on an android tablet (4.0+).
Now plug the micro USB otg cable into the tablet and from there into your CNC machine.
It is better to use a tablet with a separate 5V DC in jack.

By doing that you can always power the tablet and pilot your machine at the same time.
Once connected the tablet with the CNC machine press the "Connect" button in order to connect.
The "Verbose" button shows more details into the bottom blue scroll box.
GRBLDroid supports only 0.9+ grbl firmware. The 0.8c firmware is not supported.
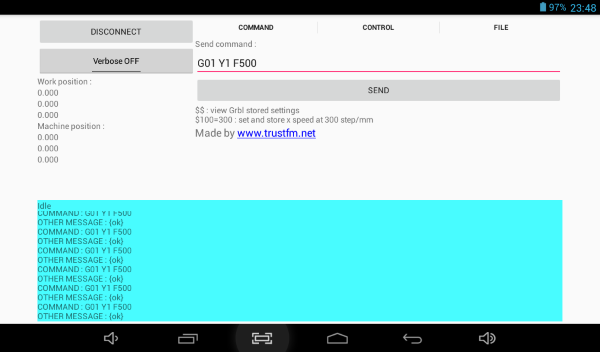
1) Command :
From the "command" tab you can send commands to your machine.
By sending "$$" you can see all the stored grbl firmware settings into the bottom blue scroll box.
More information about the commands can be found here
For example if we want to change the x max feedrate speed set it and store it at a value of 500mm/min then we have to send the command :
$110=500
In order to re-control the new stored value simply send "$$" again.
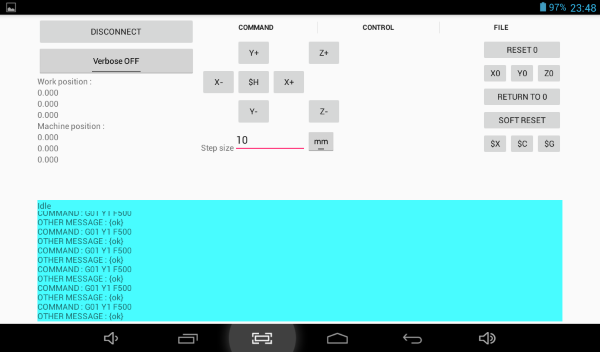
2) Manual movements (Jogging) :
First of all make sure you have set a valid step size.
Step sizes can be integers or decimal numbers.
A step size of 1mm means that each time you press the +Y button you will moved +1mm towards the y direction from the current position that you are located.
You can also toggle between mm and inches.
RESET0 : redefines the origin of the machine
X0: redefines the X origin (Set to 0 the X Work)
Y0: redefines the Y origin (Set to 0 the Y Work)
Z0: redefines the Z origin (Set to 0 the Z Work)
Return 0 : return at origin of the Work coordinates
Soft Reset : resets the machine immediately. It's real-time and can be sent at any time.
$H : This command is the only way to perform the homing cycle in Grbl.
$X : Kill alarm lock. $X override the locks and allow G-code functions to work again.
$C : This toggles the Grbl's gcode parser to take all incoming blocks process them completely, as it would in normal operation, but it does not move any of the axes.
$G : This command prints all of the active gcode modes in Grbl's G-code parser.
Some considerations about the minimal value of the step size.
Let's say we have a CNC machine using a stepper motor of 1.8 degree stepping angle.
This means that the motor has 360degrees / 1.8 = 200 steps for one full round.
If we are using microstepping x2 (our example) then we have 200*2 = 400 microsteps for a full round.
We are going to use a M8 metric threaded rod with a pitch of 1.25 mm.
This means that for each rotation of the rod we slide linearly by 1.25mm.
So our minimal resolution (1 step) is 1.25mm/400steps = 0.003125mm/step
GRBL responds with a resolution of three decimal points like this :
<Idle,MPos:0.000,0.000,0.000,WPos:0.000,0.000,0.000>
Try multiplying this minimal step with integers in order to get 0 after the third decimal point.
In our example we have : 0.003125*8 = 0.025 = 25 micron
This we can consider 0.025 as "minimal understandable resolution" for our machine.
Also after founding the "minimal understandable resolution" make sure that you always use multiple of this as step sizes.
So for example : 1mm step size is valid since 1/0.025 = 40 times.
10mm is valid since 10/0.025 = 400 times.
1.01mm step size is "invalid" since 1.01/0.025 = 40.4 times.
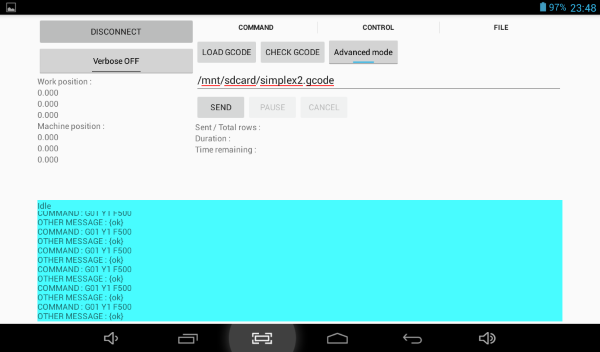
3) Send g-code file :
"Load gcode" button opens a dialog and you can load your gcode file.
"Check gcode" checks the gcode file for long strings.
Each line of the gcode file should not be longer than 80 characters including the ending enter character.
Each gcode file must be checked before sending.
More informations about this limitation can be found here
GRBLDroid supports simple and advanced file mode.
We followed the official instructions from here
The simple mode is implemented as described here :
Streaming Protocol: Simple Send-Response [Recommended for Grbl v0.9+]
The advanced mode is implemented as described here :
Streaming Protocol: Character-Counting [Recommended with Reservations]
Start by using the simple mode.
The "Hold(! command)/Resume(~ command)" button holds and resumes the file job.
The "Cancel" button cancels the job and soft resets the machine.
Video presentation :
Tips :
Use a dedicated tablet for GRBLDroid
Disable WiFi
Disable data / internet connections while using GRBLDroid
Disable GPS
Disable Autorotation
Disable Bluetooth