LiquidFiller - Documentation
LiquidFiller PX and PXT - Official Documentation ver 2.5 A
LiquidFiller PX :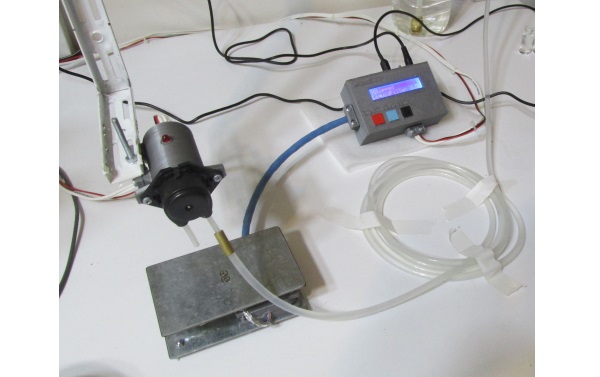
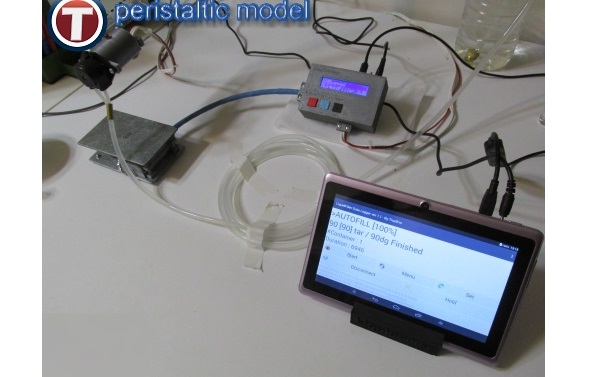
LiquidFiller PXT :
Contents
- Introduction
- Video presentation
- Features
- Disclaimers and safety
- Terminology
- Characteristics
- What is included
- Setting up the machine
- How to use
- Software
- Tips / Solutions / FAQ
- Support
- Technical stuff
- About the author
Introduction
"LiquidFiller"peristaltic is a handmade hardware device that allows you to fill small containers with certain amount of low viscosity liquid like water, essential oils perfumes and fragrances.Uses a weight sensor and measures in decigrams (1dg = 0.1gr).
Fills containers by gravity not by pressure.
The peristaltic version comes into two models :
- LiquidFiller PX
- LiquidFiller PXT
X : is the max limit of kilos that the machine can handle.
T : is the Android tablet enabled version.
For example :
LiquidFiller P0.5 is the peristaltic version that fills up to 0.5 kilos and
LiquidFiller P0.5T is the peristaltic version that fills up to 0.5 kilos containers with the Android tablet and the "LiquidFiller Data Logger" app included.
Notice that bigger max limit is, less accurate the machine becomes.
Ex :
LiquidFiller P0.2 has a +/- 0.1 gr accuracy
LiquidFiller P0.5 has a +/- 0.2 gr accuracy
"LiquidFiller" is developed, manufactured in Greece.
"LiquidFiller" can considered a handmade product since it is hand soldered, all the cases are 3D-printed and produced in ultra low scale quantities.
Each machine is individually soldered, 3D printed, assembled, calibrated and tested by us.
Video presentation
Our videos can be found at : www.yt.trustfm.net
LiquidFiller P0.5 - Demonstration - Video 1 :
www.youtube.com/watch?v=66QgeilF3Zc
LLiquidFiller P0.5T - Demonstration - Video 2 :
www.youtube.com/watch?v=p_V5lwzscMM
LiquidFiller P0.5 - Demonstration - Video 1 :
www.youtube.com/watch?v=66QgeilF3Zc
LLiquidFiller P0.5T - Demonstration - Video 2 :
www.youtube.com/watch?v=p_V5lwzscMM
Features
- Easy three button user interface
- Emergency button (Start / Stop)
- Ten weight limit presets [0] - [9] which can be saved and reloaded when needed
- Pilot the machine via Serial interface from PC and Tablets
- Data Logging features in Windows / Linux / Android* *(Only for the T model)
- No OS required for the data logging. Live Linux USB key provided
- A step by step re-calibration procedure/tool
- 1 dg (0.1gr) weight limit selection
- Weighting option. (LiquidFiller can become a scale. 100sec free run window)
- Can fill 50 containers without stop
- The machine offers RESET function
- The 0.5Kg model of LiquidFiller has a +/-0.1 dg of accuracy
- The 0.5Kg model has a minimum net (liquid only) filling weight of 5dg
- The 0.5Kg model has a maximum gross (total) filling weight of 500gr
- 3D printed plastics made with PLA bioplastic (Polylactic acid)
- Handmade, 100% individually calibrated and tested
- EU product
Disclaimers and safety
Electrical and other safetyYour safety is your own responsibility, including proper use of equipment and safety gear, and determining whether you have adequate skill and experience.
"LiquidFiller" operates at 12 VDC / 2A although this power is low you should be attentive.
If you are a younger person or are inexperienced with electrical devices, ask for help from a parent, teacher or other knowledgeable person.
More about electric safety can be found at the official page of Princeton University :
web.princeton.edu/sites/ehs/hazardcommguide/8.htm
Do not over-press the scale beyond its current maximum rate. You risk to permanently damage the device.
Hardware Disclaimer
You must accept that you and you alone are responsible for your safety and safety of others in any endeavor in which you engage.
While "LiquidFiller" is safe and secure, you are responsible for verifying its accuracy and applicability to your project.
You are responsible for knowing your limitations of knowledge and experience.
If you do any work with "mains power" such as 120 or 240 VAC power wiring, you should consult a licensed electrician.
"LiquidFiller" is not intended for use by children.
Use of these instructions and suggestions is at your own risk.
TrustFm.net disclaim all responsibility for any resulting damage, injury, or expense.
It is your responsibility to make sure that your activities comply with applicable laws.
If you feel uncomfortable with using "LiquidFiller", simply contact us [see "Support" section] to return it within 15 days for a full refund.

Software Disclaimers
LiquidFiller comes with :
a) An internal firmware called "LiquidFiller Firmware".
Please read the disclaimer before using "LiquidFiller".
By using "LiquidFiller Firmware" you agree to the following legal software disclaimer.
Requirements and Disclaimer :
I [author] do not take any responsibilities for any possible software or hardware damages.
The author is not responsible for any data loss.
Although the author will attempt to find and correct any bugs is under no obligation to provide support, service, corrections, or upgrades to "LiquidFiller Firmware".
"LiquidFiller Firmware" is provided as is without any guarantees or warranty.
Software License :
The "LiquidFiller Firmware" is a BUNDLED SHAREWARE software.
You are not allowed to clone, edit and/or modify the embedded micro-controller firmware code. If you need a new MCU with a fresh copy of "LiquidFiller Firmware" then contact us.
If you have found a bug or need a new feature then contact with us.
Once you have bought one LiquidFiller machine you own one license of "LiquidFiller Firmware" for commercial use.
One license is dedicated to one and only one LiquidFiller machine.
You are not allowed to distribute "LiquidFiller Firmware".
b) A pilot-data logger software called "LiquidFiller Data Logger".
Please read the disclaimer before using "LiquidFiller Data Logger".
By using "LiquidFiller Data Logger" you agree to the following legal software disclaimer.
Requirements and Disclaimer :
I [author] do not take any responsibilities for any possible software or hardware damages.
The author is not responsible for any data loss.
Although the author will attempt to find and correct any bugs is under no obligation to provide support, service, corrections, or upgrades to "LiquidFiller Data Logger".
"LiquidFiller Data Logger" is provided as is without any guarantees or warranty.
Software License :
"LiquidFiller Data Logger" is a BUNDLED SHAREWARE software.
Once you have bought one "LiquidFiller" machine you own one license of "LiquidFiller Data Logger" for commercial use.
One license is dedicated to one and only one "LiquidFiller" machine.
If for backup or software update reasons you need a fresh copy of "LiquidFiller Data Logger" you can download it for free from
www.trustfm.net/hardware/LiquidFiller.php?page=Download
The "LiquidFiller Data Logger" application for Android is not downloadable it comes pre-installed into your tablet.*
The "LiquidFiller Data Logger" apk package for Android is included at the tablet*
*Only valid into LiquidFiller PXT versions.
Usage : With the registered version "LiquidFiller Data Logger" can be used for personal and commercial purposes.
Distribution : You are not allowed to distribute "LiquidFiller Data Logger". We provide only some download links for update and back up purposes to our already clients.
Copy : Only customers which have bought "LiquidFiller" can make their copies for back up reasons
Commercial use : Only customers which have bought "LiquidFiller" can use "LiquidFiller Data Logger" for commercial purposes.
Modify : You can not modify the released version.
Integration : Generally No. The integration with another product should be decided from case to case, for this reason you have to contact with the author.
Terminology
Weight : Total weightTare : Tare weight
WeightTared (tared) : Net weight
WeightLimit (Weight limit) : The weight limit since the pump has to close.
If there is no tare then the weight limit is the same with the maximum total weight.
If there is a tare then the weight limit is the maximum net weight.
WeightTared (Net weight) = Weight (Total weight) - Tare
WeightTared (Net weight) = Weight limit
Characteristics
- Input power supply : 100 – 240v – 50/60 Hz.
- Operating Voltage 12DCV at 1000mA.
- The 0.5Kg model of LiquidFiller has a +/-1 dgr of accuracy.
- The machine has ten weight limit presets [0] - [9] which can be saved and reloaded when needed.
- A step by step re-calibration tool.
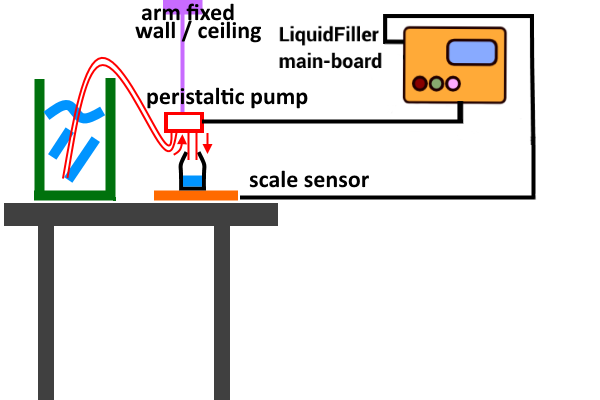
- The peristaltic pump has a flow rate : 20-60 ml/min. Must be placed using an arm that is not fixed at the table. See the figure below :
- Production : 300 small bottles (9gr total weight 4,2 gr of content) per hour
What is included
- Main Unit
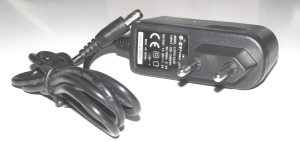
- 12V DC power supply (Input : 100 – 240v – 50/60 Hz)
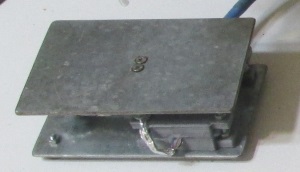
- Small galvanized steel scale with a load cell sensor
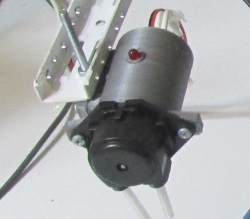
- Peristaltic pump
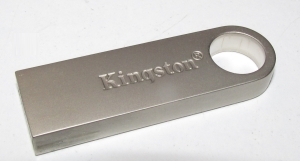
- 8GB LiquidUSB key with all software needed.
LiquidFiller Data Logger for Win/Linux is included.
LiquidUSB will be at least 8GB Flash Drive from a known branded name model like : Kingston / Verbatim / SanDisk / Toshiba / Transcend.
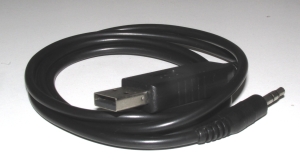
- PL2303HX USB To 3.5mm Male TTL Cable
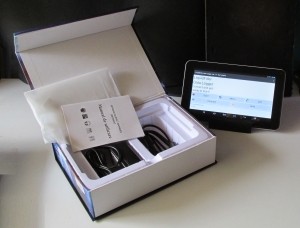
- Tablet 7 inch with "LiquidFiller Data Logger" for Android bundled application *only for XT models.
The given tablet will have at least a 7 inch touch screen, with at least a 1GHz processor, a 512MB RAM and Android OS 4+
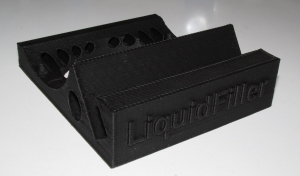
- Tablet stand *only for XT models
Setting up the machine
a) Place the main unit into a stable table.Connect the 12 V DC jack into LiquidFiller machine.
If you need pilot/data-logging plug the serial data cable into the machine as well.
Do not power up the machine yet.
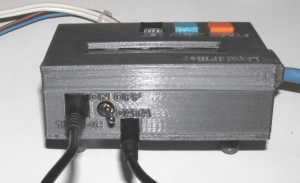
Notice that you can remove or add two longer M3 screws in order to place the main unit as you like.
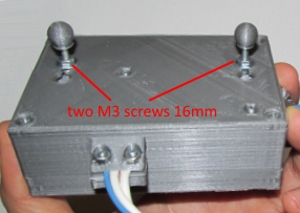
b) Place the scale at a table. Make sure that the four round plastic feet are facing down.
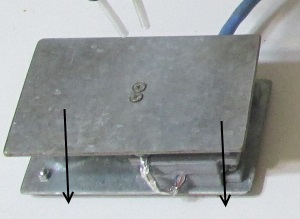
Make sure that the the two plates of the scale are parallel like the image below.
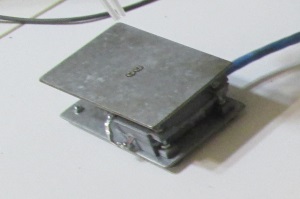
Warning : Do not exceed the nominal weight of the scale.
c) Connect a silicon tube (not included) to the input of the pump.
The input and the output of the pump will be indicated.
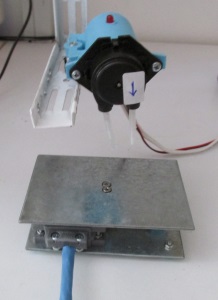
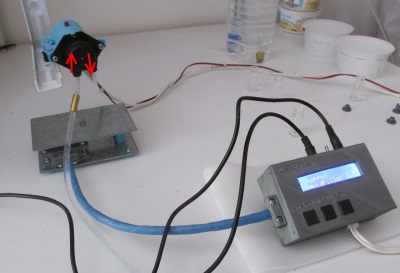
Now place the peristaltic pump into an arm that is not touching the table.
Use a M4 bolt and a nut.
By doing this you avoiding transmitting the pump vibrations over the scale.
Place a foam under the main board so when you press the buttons you do not alter the weight sensor.
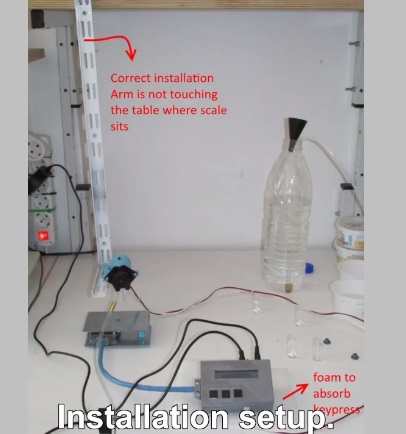
The final assembly should be like the photo below :
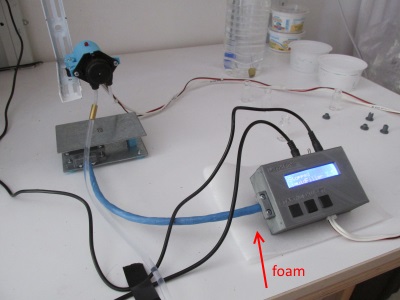
Optionally you can mount your peristaltic pump into a wall or on a pole.
If you need data logging see the section "LiquidFiller Data Logger usage" below on how to further set up the machine.
Now you can power up LiquidFiller!
How to use
Notice all the photos below indicate gr (grams) but in the peristaltic version the indication is dg (decigrams).Plug the 12 V DC power supply into a 110/220 VAC plug.
Turn the main switch ON.
By doing this
1. A green led should light
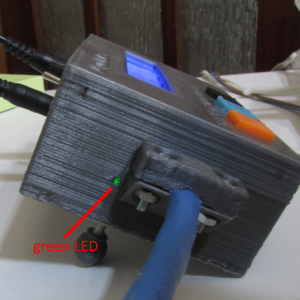
2. The LCD should indicate :
">Stopped"
"LiquidFiller 2.5"

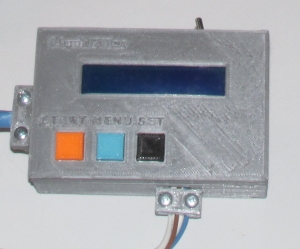
There are only three operation buttons
1. Start / Stop [red/orange]
2. Menu [blue]
3. Set [black]
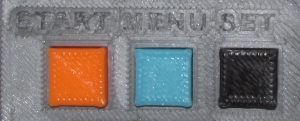
1. The Start/Stop button
The machine starts "Stopped". This means that the pump is closed.
By pressing the START/STOP button once the pump opens (start) and by pressing the same button again the pump closes (stops).
By using this button you can fill manually any containers you like.
2. The Menu and Set buttons
The MENU button allows us to move circularly into our options.
The buttons MENU and SET are active only when the machine is in "Stopped" mode (the pump is closed).
By pressing the MENU button we navigate circularly in the options below
(a-b-c-d-e-f-g-h-i-j-k-l-m-n-o-p-a-b...)
a) AUTOFILL
By pressing once the MENU button we can see the option "AUTOFILL".
At the second line we can see the current weight limit.

Before start filling make sure from the weight mode (b) that the scale unloaded is at 0dg,
if not, unload the scale, switch off the machine and re-power it again.
Notice that the weight limit is the limit once reached the pump should close.
If the weight limit is what you desire then place an empty container in the scale.
By pressing once the SET button the pump opens until the Weight tared (net weight) reaches the Weight limit.
The filling percentage should start raising up.

While LiquidFiller is filling containers the red LED is ON.
When the red LED is OFF (in the LCD screen should appear the letter F(inish)) then the filling is done.
The pump during the filling process might close and reopen so ignore the on/off sound of the pump.

Once our container is filled we place another container in our scale and we press again the SET button and so on...
After 50 containers the machine will ask you to unload the scale and press the SET button in order to self-calibrate the machine.
This prevents any weight inaccuracies caused by thermal drift.

If we want to abort/cancel the auto-filling process just press twice the START/STOP button.
While we are filling the containers at the second line of our display we can see the
WeightTared/WeightLimit in decigrams.
We observe that the current tared weight increases until it reaches the weight limit during the filling process.
b) WEIGHT
The "scale mode".
LiquidFiller acts like a normal scale. At the second line we can see the
Total weight / Tared weight in decigrams

Notice that in this mode LiquidFiller takes a lot of weight measures per second and the values may vary with the time.
In this mode the SET button is disabled.
After 5 minutes, the machine will ask you to unload the scale and press the SET button.
This prevents any weight inaccuracies caused by thermal drift.

Warning : Before auto-filling bottles make sure that your unloaded scale indicates 0dg. If you have problems shut down LiquidFiller and power again the machine.
c) TARE / UNTARE

By pressing the SET button once we set the tare at the total current weight.
If we press again the SET button we will untare (set tare to zero).
Every time that the SET button is pressed we can see the tare in decigrams at the line 2 of our LCD.
d) Change (by) -1000dg

We can change the Weight limit by pressing the SET button 1000dg at a time. (1000 dg decreasing steps).
In the second line we can see the current weight limit.
For example if the current limit is 2200dg by pressing the SET button once we will change the weight limit from 2200dg to 1200dg and if we press it again we will get 200dg.
If we try to press again for 3rd time the SET button then the LCD will blink and the current limit will remain the same since we can not have negative weight limit values.
e) Change (by) -100dg

The same with the d) but with 100dg decreasing steps
f) Change (by) -10dg

The same with the d) but with 10dg decreasing steps
g) Change (by) -1dg

The same with the d) but with 1dg decreasing steps
h) Change (by) +1000dg

The same with the d) but with 1000dg increasing steps
i) Change (by) +100dg

The same with the d) but with 100dg increasing steps
j) Change (by) +10dg

The same with the d) but with 10dg increasing steps
k) Change (by) +1dg

The same with the d) but with 1dg increasing steps
l) Save current (weight) limit
In the second line we can see the current limit in decigrams.

LiquidFiller can store (save) up to 10 weight limits that you use most.
Once you have set your favourite limit by using the (d-k) options you can store the current value into one of the ten available presets [0] – [9].
By pressing for short time (less than a second) the SET button you can change the preset position that you want to store the current limit (circular rotation from position 0 to 9 and so on).
Once you have decided in which position you want to store your current limit just hold the SET button for 5 seconds and the current value will be stored in the position you selected.
Notice that the older value at the same preset position will be deleted (overwritten).
Save weights only when you really need them since the EEPROM has 100.000 rewrites.
The preset at the position 0 is the one that is loaded every time the machine starts. [The position 0 is the favorite/default preset].
m) Load saved preset

By pressing for short time (less than a second) the SET button you simply rotate between the 10 available presets [0] - [9].
Once you have found the preset that you want to use just hold the SET button for more than 5 seconds in order to select it.
In the second line you can find the current weight limit.
n) RESET limit

By pressing the SET button we set our favourite preset [0] with the default limit of 1000 decigrams and the current weight limit at 1000 decigrams.
o) Calibrate (the) scale.

With this 4 step procedure we can re-calibrate your scale.
You can escape from this 4-step procedure when you are at the 2nd or 4th step by pressing the MENU button.
Escaping does not effect the machine at all.
Before beginning with this procedure you have to find one known weight between 1000-5000dg.
You can use a weight that is exactly 1000dg or 1500dg or 2000dg or 2500dg or 3000dg or 3500dg or 4000dg or 4500dg or 5000dg.
Ex : weight 4000dg
Once you have this weight you can begin the calibration procedure by pressing the SET button.
Notice that during the calibration LiquidFiller will open the pump for a short period of time so it is wise to close the tank.
Once saved the new calibration you can press the MENU button in order to navigate the options.
p) Shows the current status of the machine (STARTED/Stopped)

Notice that by keep pressing the MENU button you are navigating though the options a-b-c ... o-p-a... and so on.
By pressing once the MENU button we can see the option "AUTOFILL".
At the second line we can see the current weight limit.

Before start filling make sure from the weight mode (b) that the scale unloaded is at 0dg,
if not, unload the scale, switch off the machine and re-power it again.
Notice that the weight limit is the limit once reached the pump should close.
If the weight limit is what you desire then place an empty container in the scale.
By pressing once the SET button the pump opens until the Weight tared (net weight) reaches the Weight limit.
The filling percentage should start raising up.

While LiquidFiller is filling containers the red LED is ON.
When the red LED is OFF (in the LCD screen should appear the letter F(inish)) then the filling is done.
The pump during the filling process might close and reopen so ignore the on/off sound of the pump.

Once our container is filled we place another container in our scale and we press again the SET button and so on...
After 50 containers the machine will ask you to unload the scale and press the SET button in order to self-calibrate the machine.
This prevents any weight inaccuracies caused by thermal drift.

If we want to abort/cancel the auto-filling process just press twice the START/STOP button.
While we are filling the containers at the second line of our display we can see the
WeightTared/WeightLimit in decigrams.
We observe that the current tared weight increases until it reaches the weight limit during the filling process.
b) WEIGHT
The "scale mode".
LiquidFiller acts like a normal scale. At the second line we can see the
Total weight / Tared weight in decigrams

Notice that in this mode LiquidFiller takes a lot of weight measures per second and the values may vary with the time.
In this mode the SET button is disabled.
After 5 minutes, the machine will ask you to unload the scale and press the SET button.
This prevents any weight inaccuracies caused by thermal drift.

Warning : Before auto-filling bottles make sure that your unloaded scale indicates 0dg. If you have problems shut down LiquidFiller and power again the machine.
c) TARE / UNTARE

By pressing the SET button once we set the tare at the total current weight.
If we press again the SET button we will untare (set tare to zero).
Every time that the SET button is pressed we can see the tare in decigrams at the line 2 of our LCD.
d) Change (by) -1000dg

We can change the Weight limit by pressing the SET button 1000dg at a time. (1000 dg decreasing steps).
In the second line we can see the current weight limit.
For example if the current limit is 2200dg by pressing the SET button once we will change the weight limit from 2200dg to 1200dg and if we press it again we will get 200dg.
If we try to press again for 3rd time the SET button then the LCD will blink and the current limit will remain the same since we can not have negative weight limit values.
e) Change (by) -100dg

The same with the d) but with 100dg decreasing steps
f) Change (by) -10dg

The same with the d) but with 10dg decreasing steps
g) Change (by) -1dg

The same with the d) but with 1dg decreasing steps
h) Change (by) +1000dg

The same with the d) but with 1000dg increasing steps
i) Change (by) +100dg

The same with the d) but with 100dg increasing steps
j) Change (by) +10dg

The same with the d) but with 10dg increasing steps
k) Change (by) +1dg

The same with the d) but with 1dg increasing steps
l) Save current (weight) limit
In the second line we can see the current limit in decigrams.

LiquidFiller can store (save) up to 10 weight limits that you use most.
Once you have set your favourite limit by using the (d-k) options you can store the current value into one of the ten available presets [0] – [9].
By pressing for short time (less than a second) the SET button you can change the preset position that you want to store the current limit (circular rotation from position 0 to 9 and so on).
Once you have decided in which position you want to store your current limit just hold the SET button for 5 seconds and the current value will be stored in the position you selected.
Notice that the older value at the same preset position will be deleted (overwritten).
Save weights only when you really need them since the EEPROM has 100.000 rewrites.
The preset at the position 0 is the one that is loaded every time the machine starts. [The position 0 is the favorite/default preset].
m) Load saved preset

By pressing for short time (less than a second) the SET button you simply rotate between the 10 available presets [0] - [9].
Once you have found the preset that you want to use just hold the SET button for more than 5 seconds in order to select it.
In the second line you can find the current weight limit.
n) RESET limit

By pressing the SET button we set our favourite preset [0] with the default limit of 1000 decigrams and the current weight limit at 1000 decigrams.
o) Calibrate (the) scale.

With this 4 step procedure we can re-calibrate your scale.
You can escape from this 4-step procedure when you are at the 2nd or 4th step by pressing the MENU button.
Escaping does not effect the machine at all.
Before beginning with this procedure you have to find one known weight between 1000-5000dg.
You can use a weight that is exactly 1000dg or 1500dg or 2000dg or 2500dg or 3000dg or 3500dg or 4000dg or 4500dg or 5000dg.
Ex : weight 4000dg
Once you have this weight you can begin the calibration procedure by pressing the SET button.
Notice that during the calibration LiquidFiller will open the pump for a short period of time so it is wise to close the tank.
Step 1/4 : LiquidFiller ask to unload the scale within 10 seconds.

After the 10 seconds LiquidFiller should show in the screen the RAW analog values for closed and opened pump.

Step 2/4 : LiquidFiller ask you to place into the scale the exact weight.

You can change the reference weight by short pressing the SET button (500 dg circular steps) 1000, 1500, 2000, 2500, 3000, 3500, 4000, 4500, 5000, 1000, 1500 … and so on.
Once you have found the reference weight that you want to use, hold the SET button for more than 5 seconds in order to confirm the weight.

Step 3/4 : You have 10 seconds time in order to place the reference weight onto the scale.

After the 10 seconds LiquidFiller should show in the screen the RAW analog values for closed and opened pump.

Step 4/4 : If you want to save hold the SET button for more than 5 seconds.
If you want to abort press the MENU button.


After the 10 seconds LiquidFiller should show in the screen the RAW analog values for closed and opened pump.

Step 2/4 : LiquidFiller ask you to place into the scale the exact weight.

You can change the reference weight by short pressing the SET button (500 dg circular steps) 1000, 1500, 2000, 2500, 3000, 3500, 4000, 4500, 5000, 1000, 1500 … and so on.
Once you have found the reference weight that you want to use, hold the SET button for more than 5 seconds in order to confirm the weight.

Step 3/4 : You have 10 seconds time in order to place the reference weight onto the scale.

After the 10 seconds LiquidFiller should show in the screen the RAW analog values for closed and opened pump.

Step 4/4 : If you want to save hold the SET button for more than 5 seconds.
If you want to abort press the MENU button.

Once saved the new calibration you can press the MENU button in order to navigate the options.
p) Shows the current status of the machine (STARTED/Stopped)

Notice that by keep pressing the MENU button you are navigating though the options a-b-c ... o-p-a... and so on.
Software
LiquidFiller comes with a data logger software called "LiquidFiller Data Logger".This software also pilots the machine from your PC or tablet.
The software is included into a 8 GB bootable USB key.
Drivers
LiquidFiller uses a USB to Serial cable in order to communicate with other devices like computers and tablets."LiquidFiller Data Logger" needs this cable in order to function.
The cable is included on all "LiquidFiller" versions.
Currently we use this cable :
PL2303HX USB To 3.5mm Male TTL COM Module Converter Adapter Flash Cable
Our provider is :
www.lunashops.co.uk/goods-1429.html
LiquidFiller Data Logger works under Windows, Linux and Android [4.0+] tablets with USB OTG support.
It is tested under :
-Windows 8
-Windows 7
-Windows XP
-Linux Mint 17 LTS
-Xubuntu Trusty Tahr 14.04 LTS
-Android 4.0 Ice Cream Sandwich
In all cases the PL2303HX cable does not need any drivers.
The operating system recognises this device.
If you still need the official drivers you can find them here :
www.prolific.com.tw/US/ShowProduct.aspx?pcid=41
www.prolific.com.tw/US/CustomerLogin.aspx Use : "GUEST" on both Account and Password box.
www.prolificusa.com/pl-2303hx-drivers
LiquidUSB key
The LiquidUSB key contains "LiquidFiller Data Logger". A more detailed structure is shown below :->LIQUIDFILLER\Android
This folder contains the "jp.ne.shira.csv.viewer.apk" which is a free CSV viewer for Android.
In this folder you should copy "LiquidFillerDataLogger.apk" which is included at the tablet*.
*This is valid only for the LiquidFiller XT models.
Notice that the "LiquidFillerDataLogger.apk" is included only on the tablets for security reasons.
->LIQUIDFILLER\Linux\_Setups
This folder contains the setups (ZIP files) of CSVpad, which is a free CSV editor made by TrustFm and "LiquidFiller Data Logger" for Linux.
Both programs comes with 32bit and 64 bit versions.
->LIQUIDFILLER\Linux\32bit
Here can be found the 32 bit versions of CSVPad and "LiquidFiller Data Logger" for Linux unzipped and ready to use.
Both of the applications are portable so from any PC you can use them directly from the USB key.
->LIQUIDFILLER\Linux\64bit
Here can be found the 64 bit versions of CSVPad and "LiquidFiller Data Logger" for Linux unzipped and ready to use.
Both of the applications are portable so from any PC you can use them directly from the USB key.
->LIQUIDFILLER\Windows\_Setups
This folder contains the setups (ZIP files) of CSVpad, which is a free CSV editor made by TrustFm and "LiquidFiller Data Logger" for Linux.
Both programs come with 32bit and 64 bit versions.
This folder contains "LibreOfficePortable_4.3.5_MultilingualNormal.paf.exe" which is the installer for the portable edition of LibreOffice.
LibreOffice includes "Calc" which can be used to plot the CSV files generated by "LiquidFiller Data Logger".
In the same folder "Win32DiskImager-0.9.5-install.exe" is located.
This tool can be used in order to clone the USB key (see next section).
->LIQUIDFILLER\Windows\CSVpad 32bit
CSVPad 32 bit for Windows unzipped and ready to use.
->LIQUIDFILLER\Windows\CSVpad 64bit
CSVPad 64 bit for Windows unzipped and ready to use.
->LIQUIDFILLER\Windows\LibreOffice
LibreOffice portable edition uncompressed and ready to use.
->LIQUIDFILLER\Windows\LiquidFiller-Data-Logger 32bit
"LiquidFiller Data Logger" 32 bit for Windows unzipped and ready to use.
->LIQUIDFILLER\Windows\LiquidFiller-Data-Logger 64bit
"LiquidFiller Data Logger" 64 bit for Windows unzipped and ready to use.
->LIQUIDFILLER\USB to Serial Cable - Drivers.html
This file contains information on how to get the drivers for the PL2303HX USB To 3.5mm Male TTL Cable adapter.
->LIQUIDFILLER\LiquidFiller X and XT - Official Documentation.pdf
The official documentation (offline pdf file).
->LIQUIDFILLER\LiquidFiller X and XT - Quick Manual.pdf
The quick manual (offline pdf file).
Notice that the provided LiquidUSB key is also bootable.
Contains two live and persistent operating systems of Xubuntu 14.04 Trusty Tahr a 32 bit and a 64 bit.
So to sum up "LiquidFiller Data Logger" can be used :
- From a PC with Windows 32 bit via
->LIQUIDFILLER\Windows\LiquidFiller-Data-Logger 32bit - From a PC with Windows 64 bit via
->LIQUIDFILLER\Windows\LiquidFiller-Data-Logger 64bit - From a PC with Linux 32 bit via
->LIQUIDFILLER\Linux\32bit\LiquidFiller-Data-Logger - From a PC with Linux 64 bit via
->LIQUIDFILLER\Linux\64bit\LiquidFiller-Data-Logger - From a PC 32 bit without any operating system
->Live bootable USB stick select xubuntu i386 - From a PC 64 bit without any operating system
->Live bootable USB stick select xubuntu amd64 - From a Tablet with Android* *only valid with LiquidFiller XT
Clone LiquidUSB key
LiquidUSB key comes with LiquidFiller machine. You can not download the image of the LiquidUSB online.If you lose the LiquidUSB you have two options
- Buy another LiquidUSB key from :
www.trustfm.net/hardware/LiquidFiller.php?page=Order - Download "LiquidFiller Data Logger" from :
www.trustfm.net/hardware/LiquidFiller.php?page=Download.
This option does not cover the bootable option that LiquidUSB key offers. You can reconstruct manually LiqudUSB key from scratch by using YUMI.
LiquidFiller Data Logger for Android is not included on LiquidUSB it is located only on the given tablet.
Cloning LiquidUSB under Windows
Plug your LiquidUSB key.If you receive an error message like this :
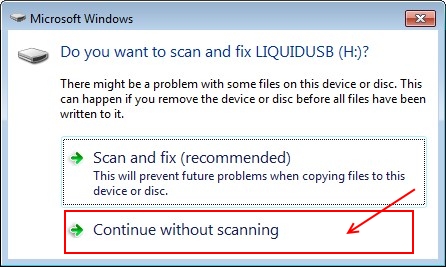
select "Continue without scanning".
Now go to ->LIQUIDFILLER\Windows\_Setups and double-click "Win32DiskImager-0.9.5-install.exe".
Install the Win32DiskImager locally and run it.
Find your root path of your LiquidUSB and select it in the drop down menu of Win32DiskImager. In our case is H:\
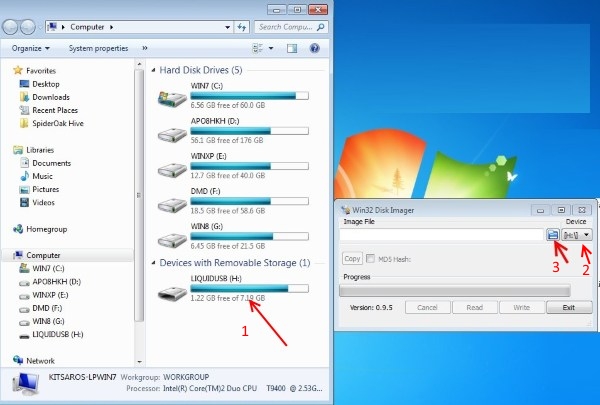
Now hit the blue folder button indicated in the picture above and select your output path and your image name. Ex : "D:/liquidusb.img"
Now hit the "Read" button in order to generate your clone image.
This operation takes a while please wait.
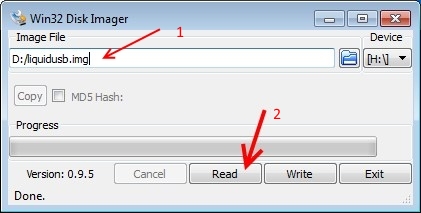
Once the img file is generated you can restore it into a new empty USB key by using Win32DiskImager.
Plug your new empty USB device and select it from the drop down menu like you did before.
Now press the blue folder button and load your img file.
Hit the write button like the image below :
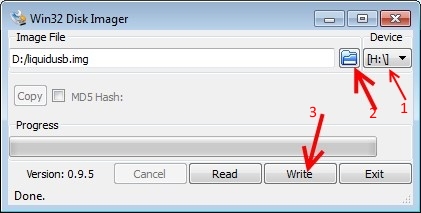
You are done !
Cloning LiquidUSB under Linux
In order to create the img file under Linux just plug the LiquidUSB into your machine and use the command dd.Let's find out more details about this operation.
Once mounted LiquidUSB do from the konsole :
>sudo fdisk -l
find the usb disk called for example :
Disk /dev/sdd: 7756 MB, 7756087296 bytes
Now do :
>sudo dd if={usb device} of=./liquidusb.img
for example :
>sudo dd if=/dev/sdd of=./liquidusb.img
liquidusb.img will be generated into our home directory after few minutes. Please be patient.
Now let's see how to add the generated img file into a new USB stick.
Give this command from the konsole :
>sudo fdisk -l
Find the USB partition, for example :
Device Boot Start End Blocks Id System
/dev/sdd1
Now unmount the USB partition for example :
>umount /dev/sdd1
Again from konsole do :
>sudo fdisk -l
Find the USB disk for example :
Disk /dev/sdd: 7756 MB, 7756087296 bytes
Now clone the img file into your new USB key by giving the command via konsole :
>sudo dd if=./liquidusb.img of=/dev/sdd
Once done you can unplug the USB key.
Now plug again the LiquidUSB key and make sure it works like the original one.
LiquidFiller Data Logger usage
In this section we will describe how to use "LiqudFiller Data Logger".Connection :
Switch OFF LiquidFiller.
Plug the 12VDC jack into the main board located at the back of LiquidFiller main board.
Now plug your "PL2303HX USB To 3.5mm Male TTL" cable into the female DATA audio jack.
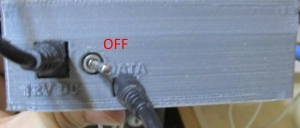
Now connect the "PL2303HX USB To 3.5mm Male TTL" cable into your Computer or Tablet.
| On Computer : | On Tablet : |
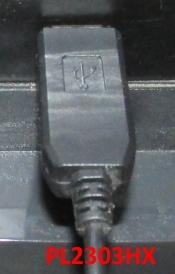
|
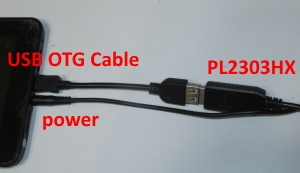
|
If you are going to use the tablet do not forget to plug it into the power.
Avoid using the tablet only with the battery.
Also on tablet make sure from "Settings" > "Display" > "Sleep" that the "Never sleep" option is checked.
Make sure the WiFi of your tablet is disabled, even better, activate the "Aeroplane mode".
LiquidFiller XT comes with a tablet stand. The stand has various mount holes. Mount it as you like and place the tablet into the slot.
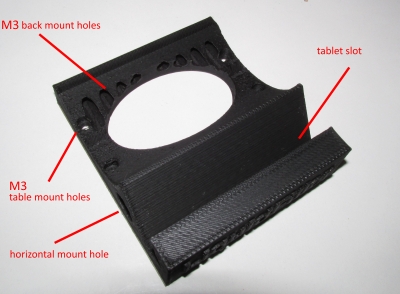
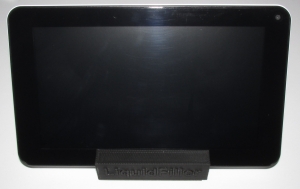
LiquidUSB is not needed to be plugged in at this point.
Now power up LiquidFiller.
On Desktop or laptop with Windows/Linux
Boot into your operating system (Windows/Linux) and log in as administrator.Plug LiquidUSB into your computer.
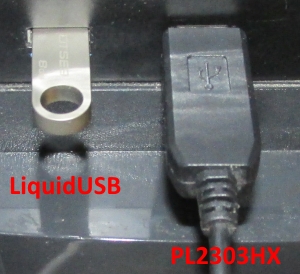
Installation :
Just unzip the desired files into your desired Hard Disk local location.
No need for further installations are needed.
For Linux the setups are located : >LIQUIDFILLER\Linux\_Setups
For Windows the setups are located : >LIQUIDFILLER\Windows\_Setups
Notice that CSVpad, "LiquidFiller Data Logger" and LibreOffice are portable so they can work directly from the LiquidUSB but it is way better to place them on a local hard drive location since you have an Operating System already installed.
You need to find out if you have a 32bit or a 64bit operating system and use the correct bit version for CSVpad and "LiquidFiller Data Logger" applications.
Once installed (unzipped) the needed programs into your computer LiquidUSB is not needed any more so you can unplug it.
Usage :
You need to find the communication port.
Make sure you connected your "LiquidFiller Data Logger" into your computer using the "PL2303HX USB To 3.5mm Male TTL" cable.
Make sure that the serial cable is recognized by your system.
If you have recognition problems take a look at the "Drivers" section
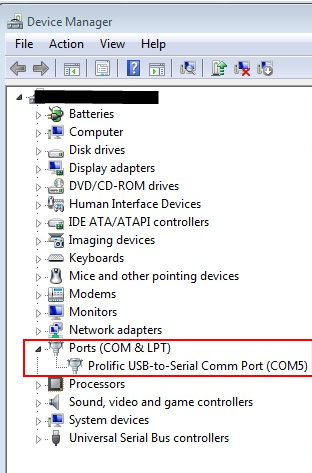
In Windows go to :
Start->Control Panel->System->Device Manager->Ports
and find your COM port used by the serial cable. (Prolific USB to serial Comm).
In this example we see that the communication port is : COM5
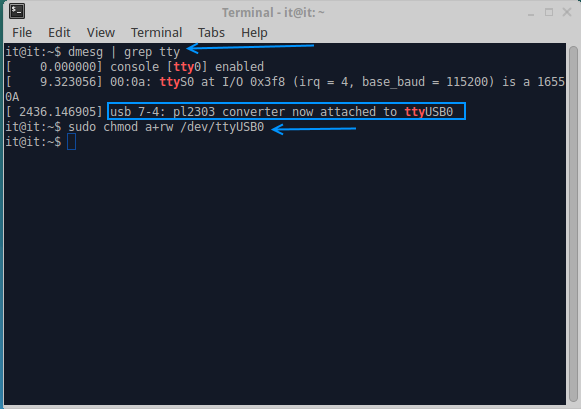
In Linux use this command via terminal (konsole) :
>dmesg | grep tty
This command will list all the recognized USB devices.
Try to find where is attached the "pl2303" converter
Usually is attached at "/dev/ttyUSB0"
Now send this command via terminal (konsole) :
>sudo chmod a+rw /dev/ttyUSB0
Give your admin password and hit Enter.
The given Linux commands can be seen in the image below :
Once you have found your communication port for LiquidFiller launch "LiquidFiller Data Logger" by double clicking the application.
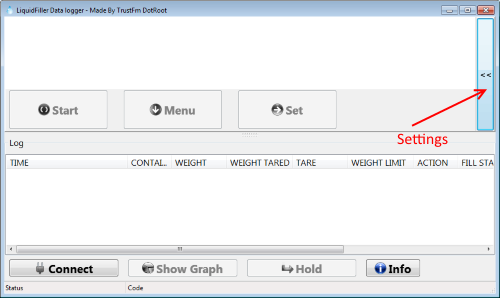
Once launched hit the << arrows in order to set the settings. Take a look at the picture below.
Settings :
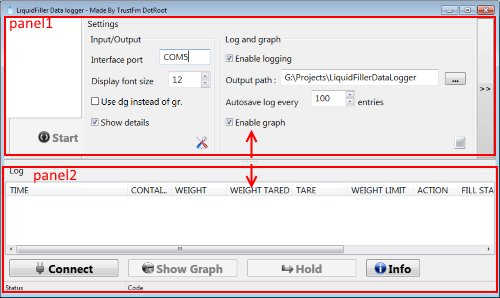
Interface port give the port found before (ex. Linux : /dev/ttyUSB0, Windows : COM5).
Display font size : the font size of the display. 12 is a good starting value.
Use dg instead of gr : Use decigrams instead of grams. (recommended value : checked / true).
Show details : Show more or less details into the display. (recommended value : checked / true).
Enable logging : enables the auto generation of csv files for later investigation. (recommended value : checked / true).
Output path : Set a valid output folder path where all the auto-generated csv files will be stored.
Notice that the csv files will have names like this :
"YYYY-MM-DD-HH-mm-ss.csv" for example : "2015-01-12-05-58-16.csv"
Autosave every X entries : every X entries we store them in our csv file (recommended value : 100).
Enable graph Enables the real time graph (recommended value : checked / true)
The settings panel filled with the recommended values is shown below
Notice that you can also resize the two horizontal panels like the picture below
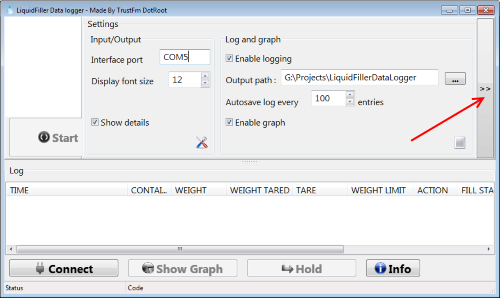
Once you are set hit the >> arrows in order to hide the settings window like the picture below:
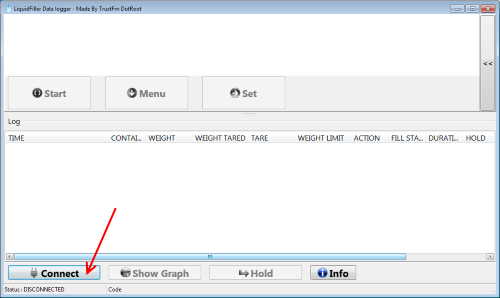
Now you can hit the "Connect" button like the picture below :
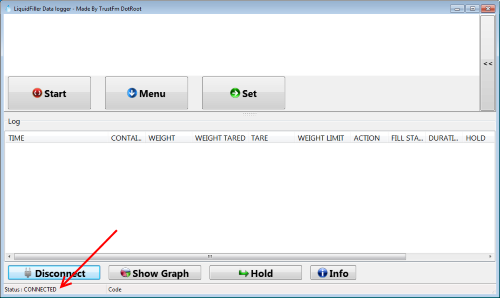
Once you are connected you should see at the status bar that you are connected like the picture below :
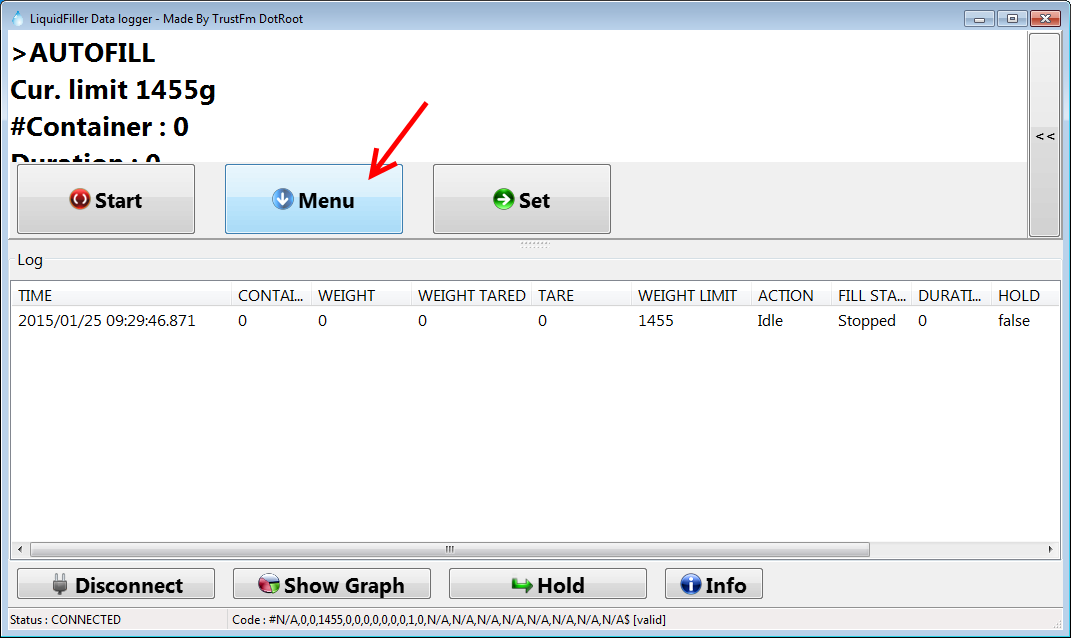
Now you can navigate the menu of LiquidFiller using the MENU button.
As you can see from the photo below with "LiquidFiller Data Logger" you can also pilot LiquidFiller from your computer.
Notice that the long/short click of the SET button is also emulated.
Also be aware that if you hit the START button the pump will open. You should be careful of what you are doing at this point.
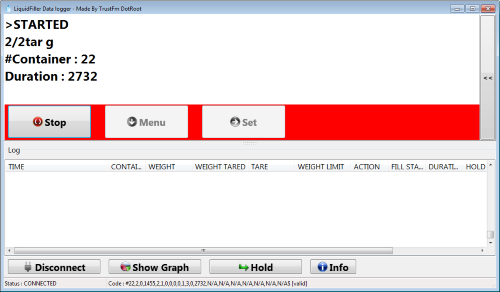
If you want to start filling bottles notice that when the pump is open the button panel becomes red in order to warn you (picture below).
Also the red LED of the pump should be on.
By hitting the "Show Graph" button the Graph window will appear
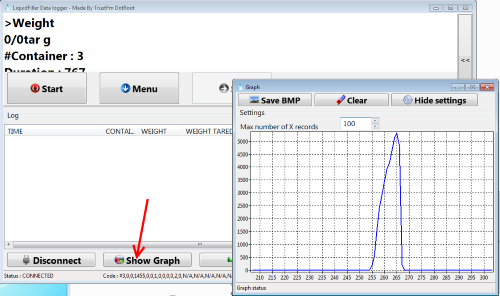
From the Graph window we can save the current graph by hitting the "Save BMP" button. The image will be saved in the same path of the csv files.
"Clear" button : just erases the graph.
The "Show/hide settings" button shows/hides the extra graph settings.
Max number of X records : how large is the X axis. For a bigger X value more CPU is needed. (Recommended value : 100).
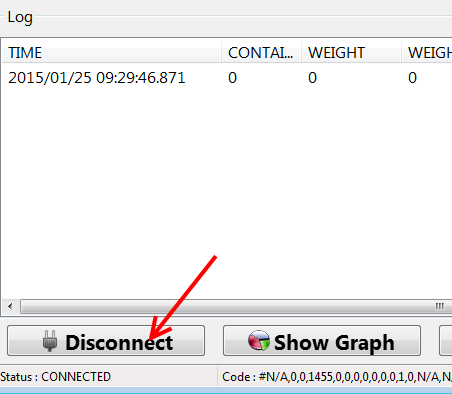
By hitting the "Disconnect" button you can disconnect "LiquidFiller data logger" from LiquidFiller.
Check the status bar in order to confirm the disconnection.
Now you should be able to exit the application or change the program settings
On Desktop or laptop without an OS (Live mode)
LiquidUSB key is also bootable.Even if you haven't an Operating System you can still use "LiquidFiller Data Logger" directly from LiquidUSB key.
LiquidUSB contains a Persistent Live Linux Distro (Xubuntu). Even an inexperienced user can use "LiquidFiller Data Logger" without problems.
Plug in your LiquidUSB key and then power up your PC.
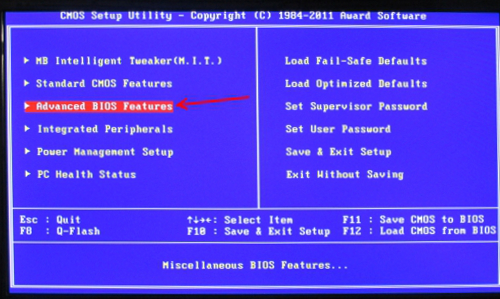
Press the DEL or F2 or F12 or F1 or F2 button (depending on your computer) in order to log into your BIOS.
Go to "Advanced BIOS Features" using the arrow keys
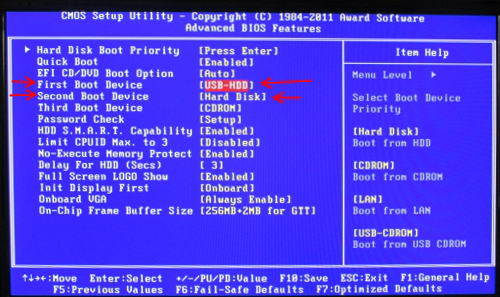
Set as "First Boot Device" the "USB-HDD".
If you have a Hard Disk set as "Second Boot Device" a "Hard Disk"
Now go to the main menu using the ESC button and select the voice "Save and Exit"
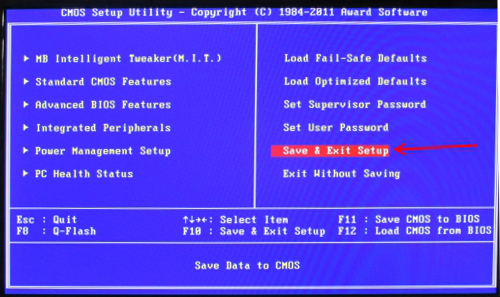
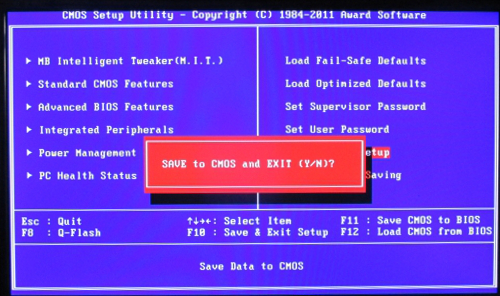
Press the "y" button in order to save the settings.
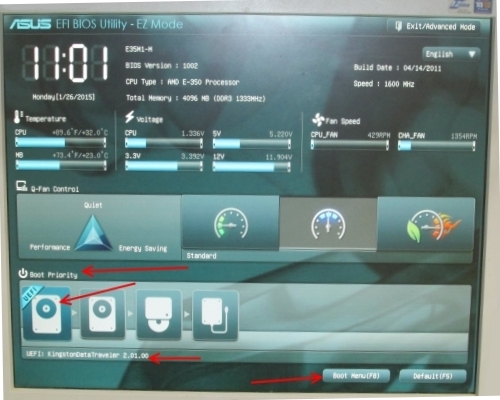
If you have an UEFI bios then press the DEL or F2 or F12 or F1 or F2 button (depending on your computer) in order to log into it.
Then select the LiquidUSB key as first booting device from the "Boot priority" list.
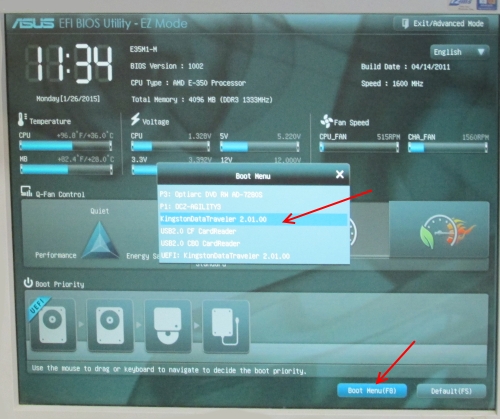
Now hit the "Boot menu" button and select the LiquidUSB key
Once booted from the LiquidUSB key select the "Linux Distributions" option using the down arrow within 30 seconds.
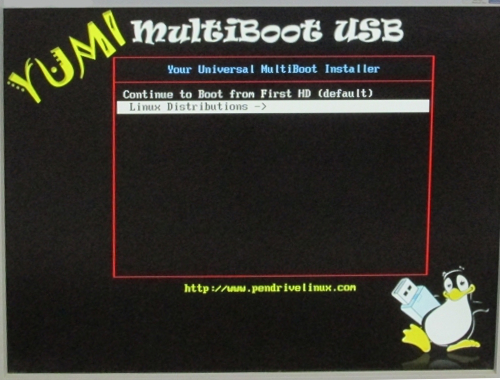
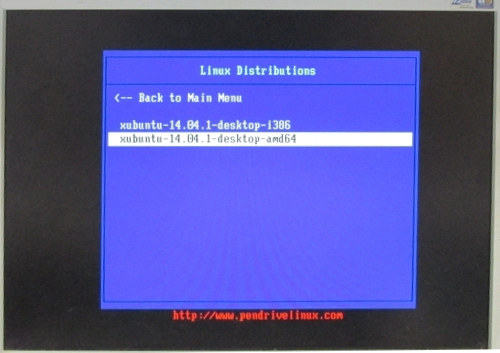
Now select "xubuntu i386" if you have a 32 bit computer(older PCs) or "xubuntu amd64" if you have a 64bit computer (newer PCs).
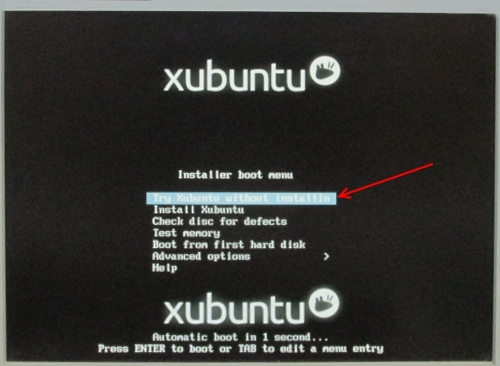
Just wait 5 seconds or select "Try Xubuntu without installing" (default / first option) like the picture shown below.
Once logged to xubuntu you should have a screen like this :
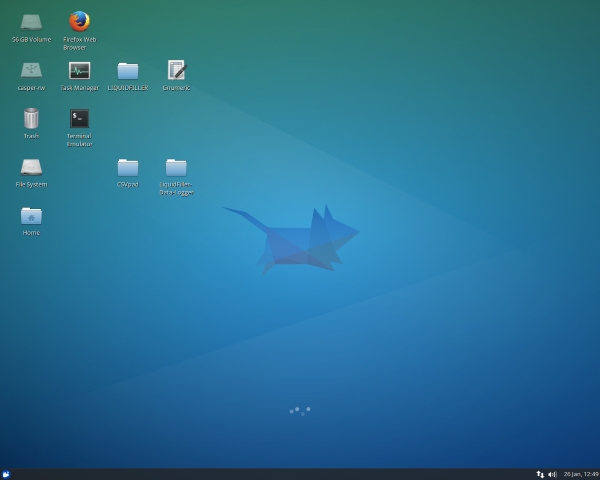
As you can see in the Desktop you have everything you need.
- LIQUIDFILLER folder (contains the installations of "LiquidFiller Data Logger" and CSVpad and some help files)
- "LiquidFiller Data logger" folder (contains the unzipped ready to use "LiquidFiller Data Logger" application)
- CSVpad folder (contains the unzipped ready to use CSVPad application)
- Gnumeric : a CSV viewer for Linux
- FireFox
- Terminal emulator (Konsole)
- Task manager
>dmesg | grep tty
The command will list all the recognized USB devices.
Try to find where is attached the "pl2303" converter
Usually is attached at "/dev/ttyUSB0"
Now send this command via terminal (konsole) :
>sudo chmod a+rw /dev/ttyUSB0
and hit Enter.
The given Linux commands can be seen in the image below :

Now you can start regularly "LiquidFiller Data Logger".
"LiquidFiller Data Logger" usage is exactly the same shown at "On Desktop or laptop with Windows/Linux" section.
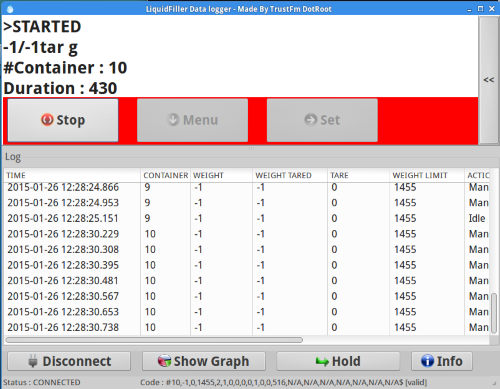
The csv files are stored at "LiquidFiller Data logger" folder by default since Xubuntu is persistent in LiquidUSB.
Both Xubuntu distros 14.04 LTS (32 and 64 bit) have around 1GB of free space into LiquidUSB key. (1200 MB persistent file each OS)
If you like Xubuntu you can install it. The ISO files are located at >multiboot\ISOS.
Once done you can disconnect "LiquidFiller Data Logger" and close the application .
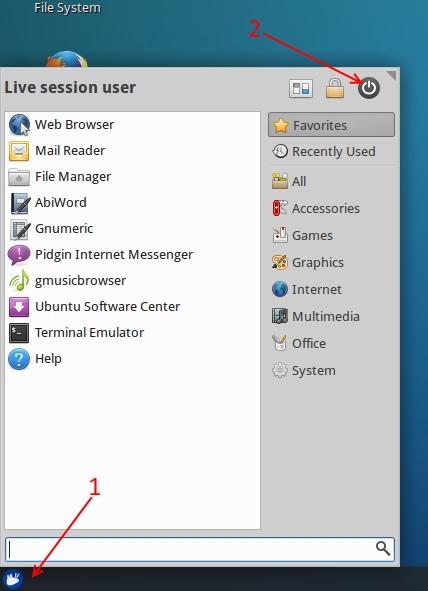
You can shut down Xubuntu by clicking in the bottom left angle the mouse icon (1) and then the power icon(2) shown in the photo below.
Just hit the shut down button indicated on the photo below.
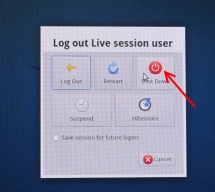
As you can see the shut down procedure is almost identical with Windows
On Tablet* *only for PXT models
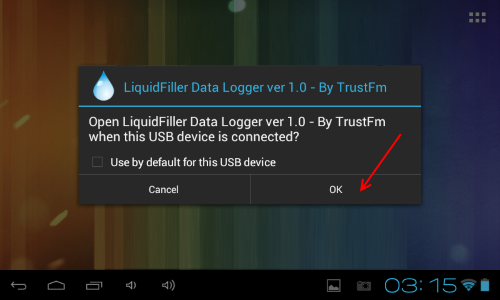
Notice that the "LiquidFillerDataLogger.apk" is included only on the tablets for security reasons.Now, once plugged the OTG cable with the tablet the follow pop up window will appear into your tablet.
Press the "OK" button.
In the main screen find the android settings button like the picture below.
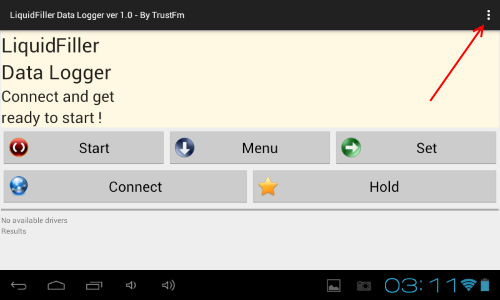
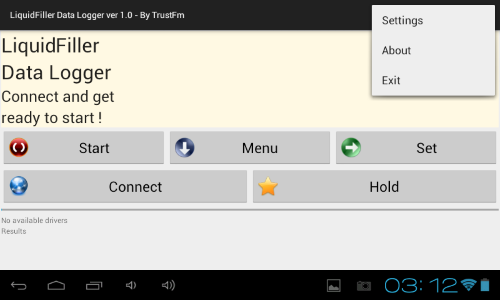
A floating menu should appear like the photo below.
Settings : The settings panel
About : The about box panel
Exit : Exit the application
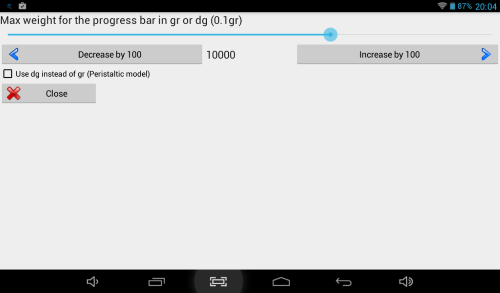
By hitting "Settings" we get the settings panel.
By sliding the sliding bar you can set the max limit of the progress bar.
If you have a P0.5X LiquidFiller set the progress bar around 5000 decigrams.
Check the use dg instead of gr check box.
Once done press the "Close" button.
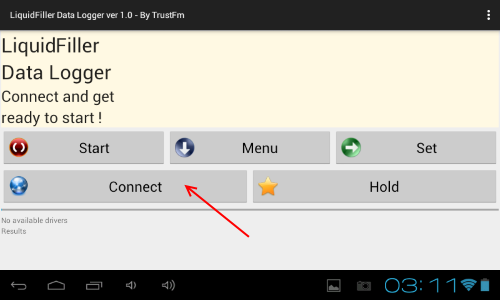
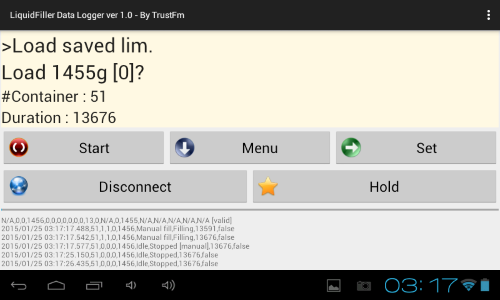
Now you can hit the connect button from the main screen.
You should now be able to pilot your LiquidFiller machine by using the three main buttons (START / MENU / SET).
Notice that the long/short click of the SET button is also emulated.
Also be aware that if you hit the START button the pump will open. You should be careful of what you are doing at this point.
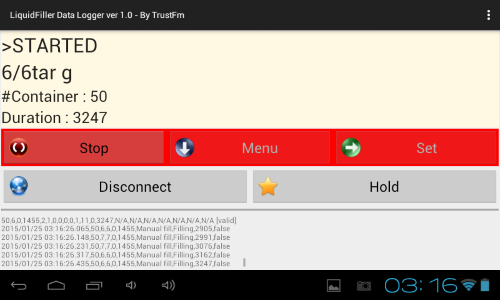
If you want to start filling bottles notice that when the pump is open the button panel becomes red in order to warn you (picture below).
Also the red LED of the pump should be on.
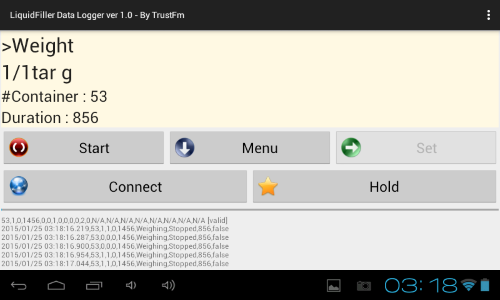
By hitting the "Disconnect" button you can disconnect "LiquidFiller data logger" from LiquidFiller.
Now you should be able to exit the application or change the program settings.
Notice that you can re-connect by pressing the "Connect" button.
By default "LiquidFiller Data Logger" on tablet auto-saves the csv files into the "LiquidFillerFiles" folder on your root android folder.
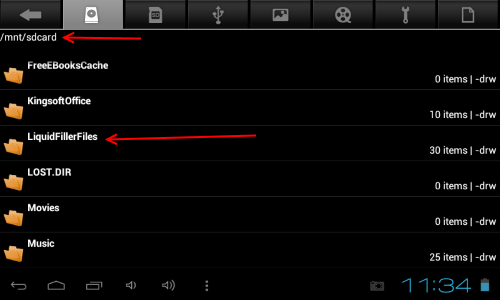
Notice that the csv files will have names like this :
"YYYY-MM-DD-HH-mm-ss.csv" for example : "2015-01-12-05-58-16.csv"
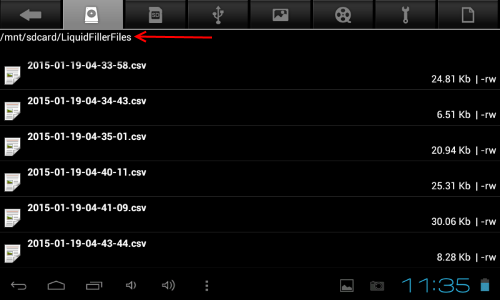
The csv files can be viewed using "CSV viewer" or transferred by plugging the LiquidUSB key into the tablet like this :
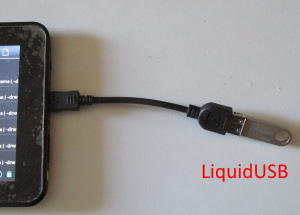
Tips / Solutions / FAQ
1) How can I fill bottles based on litres and not based in grams?The solution is simple. Fill the first bottle with the START/STOP "manual" method. You can use a funnel as well but make sure that always use the same funnel while you are filling your containers.
Now using the MENU we go to the WEIGHT option and we find our current total weight Ex 4650dg.
We set the current limit at 4650 by using the d-e-f-g-h-i-j-k options.
Now we can select the AUTOFILL mode in order to fill our bottles.
Notice that if we want we can save this limit using the MENU button (l)
2) My LiquidFiller oscillates in WEIGHT mode !
Plug LiquidFiller in an isolated AC plug socket.
Do not touch the power supply during the operation.
Remove any EMF field generators [http://en.wikipedia.org/wiki/Electromagnetic_field] like cellphones or video cameras.
Make sure that the scale is correctly connected with the LiquidFiller.
There are no other cables between scale and LiquidFiller.
3) I place 4000dg total weight limit and I always get 4020dg as final result. How can I fix this problem?
The solution is to change the current limit to 3980dg using the d-k options or to lower the filling flow using a water pipe stop tap.
4) No flow even if the pump is open [Red LED is ON]
Make sure that tube is not clogged.
Make sure that tube does not contain air.
Let the pump remove all the air might take some time.
Also check the versus of the peristaltic pump (input/output).

5) Guarantee of LiquidFiller
If you feel uncomfortable with using "LiquidFiller", simply contact us [see "Support" section] to return it within 15 days for a full refund.

Support
Official support about this project you can find using this email :or by using our support page :
www.trustfm.net/hardware/LiquidFiller.php?page=Support
Documentation [latest and more updated version] :
www.trustfm.net/hardware/LiquidFiller.php?page=Documentation
The official site of this project is :
www.trustfm.net/hardware/LiquidFiller.php
Technical stuff
LiquidFiller was prototyped and manufactured in Rethymno/Crete Greece [Hellas] by Karydis Anastasios aka TrustFm ( www.trustfm.net ) of summer 2011 based on an idea & need of Karolos Kandilakis for his olive oil business ( www.olive.kandilakis.com ).The prototype was presented publicly at www.hw2sw.com.
LiquidFiller project is based on Arduino hardware platform.
Was designed using only open source tools.
For the hardware part we have used :
Arduino Board : LiquidFiller programmer (www.arduino.cc)
Atmel Studio : LiquidFiller Firmware (www.atmel.com)
KiCAD : PCB design (www.kicad-pcb.org)
LibreCAD : 2D Scale design (www.librecad.org)
Prusa I3 : 3D printer (www.reprap.org)
FreeCAD : 3D printed designs (www.freecadweb.org)
OpenSCAD : a software for creating solid 3D CAD objects (www.openscad.org)
Cura : 3D model to toolpath Slicer (www.ultimaker.com)
Slic3r : 3D model to toolpath Slicer (www.slic3r.org)
Repetier Host : 3D printer feeder (www.repetier.com)
Marlin firmware : 3D printer firmware (www.github.com/MarlinFirmware)
For the software part we have used :
Arduino IDE : LiquidFiller Firmware (www.arduino.cc)
CodeTyphon : "LiquidFiller Data Logger" for Windows and Linux (www.pilotlogic.com)
SynaSer : Network communication library (www.synapse.ararat.cz)
Android Studio : "LiquidFiller Data Logger" for Android (developer.android.com)
usb-serial-for-android : Android USB host serial driver library (www.github.com/mik3y)
YUMI : Multiboot USB Creator (www.pendrivelinux.com)
Xubuntu 14.04 Trusty Tahr : Permanent Live USB Linux OS (www.xubuntu.org)
VirtualBox : a virtualization software package (www.virtualbox.org)
7-Zip : a file archiver with a high compression ratio (www.7-zip.org)
UPX : a packer for executables (www.upx.sourceforge.net)
Gimp : Image manipulation program (www.gimp.org)
Notepad++ : Documentation (www.notepad-plus-plus.org)
About the author
I do not like to talk about myself, I only write this information in order to understand the credibility of my product since i am selling it.TrustFm is a life time project by Karydis Anastasios.
I am a software and hardware developer.
Desktop implementations (Win32,Linux,MacOS) are developed using C, C++, CodeBlocks, FreePascal, Turbo delphi, CodeTyphon
web applications using PHP5 with OOP
and Android applications using Android Studio.
Hardware prototyping is developed using Arduino platform and Atmel Studio.
TrustFm location on Google Maps
Some of my works/projects :
Please notice that at ConversionCenter.net and FreeSoftwareTools.net i am collaborating with Ajax G. ,
and at Hw2Sw.com i am collaborating with Riccardo Giuliani.
- SOFTWARE PROTOTYPING AND DEVELOPMENT
- Desktop applications
Avi2Dvd AVI to DVD converter
[www.trustfm.net/software/video/Avi2Dvd.php]
Desktop Zoomer Screen magnifier
[www.trustfm.net/software/video/DesktopZoomer.php]
NoZip File joiner & splitter with steganography
[www.trustfm.net/software/utilities/NoZip.php]
Foto2Avi Video editor & video slideshow maker
[www.trustfm.net/software/video/Foto2Avi.php]
Screen2Avi Screen recorder
[www.trustfm.net/software/video/Screen2Avi.php]
Avisub Add subtitles into AVI
[www.trustfm.net/software/video/AviSub.php]
Folder2Iso Generate ISO from any folder
[www.trustfm.net/software/utilities/Folder2Iso.php]
Contact Contacts A secure organizer
[www.trustfm.net/software/utilities/ContactContacts.php]
- Mobile applications
Clicker4Dog Pet training tool
[www.trustfm.net/software/mobile/Clicker4Dog.php]
- Web applications (services)
Conversion Center [www.conversioncenter.net]
Ip locator [www.trustfm.net/IpLocator]
- Embedded applications (micro controllers)
LiquidFiller [www.trustfm.net/hardware/LiquidFiller.php]
SwitchController [www.hw2sw.com]
- Desktop applications
- HARDWARE PROTOTYPING, DEVELOPMENT AND REALIZATION
TrustFm / Hardware ( www.trustfm.net/hardware )
Hw2Sw ( www.hw2sw.com )
- EDUCATION, KNOWLEDGE AND DOCUMENTATION
Selling Digital Products with PayPal ( www.trustfm.net/ebooks )
Software and hardware documentation ( www.hw2sw.com )
- REFERENCE
For metric units : www.conversioncenter.net
For free applications : www.freesoftwaretools.net
Video link : http://www.youtube.com/watch?v=vVwAfzBNV8Y