Screen2Avi - Documentation
The official online documentation of Screen2Avi. Here you can find all the capabilities of Screen2Avi.
1) Installation
Screen2Avi has two versions, the installable and the portable one.
Select the one that fit at your needs.
Use the bundled installer for the installable version and follow the instuctions.
For the portable zipped version just extract (unzip) the "Screen2Avi" zip file into your desired location.
2) Execution
Just open the Screen2Avi folder and doubleclick on the Screen2Avi icon.
The installable version of Screen2Avi addds a nice icon on your desktop.
3) Settings
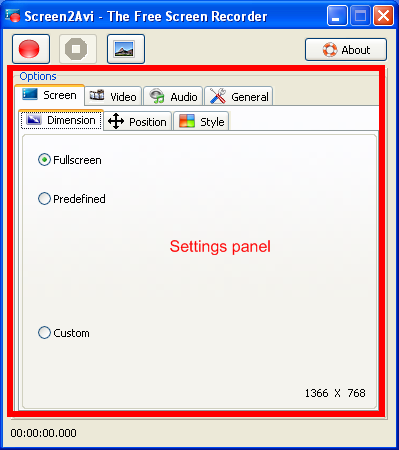
From the Options panel hit at "Screen" tab select select "Dimension".
With this option you set the capture "window"
You have three options here :
- Full screen
- Predefined
- Custom
The available options are :
- Top Left
- Top Center
- Top Right
- Center Left
- Center
- Center Right
- Bottom Left
- Bottom Center
- Bottom Right
- Custom
You can toggle the background if you like even when you are recording using the appropriate hotkey (default value is F9).
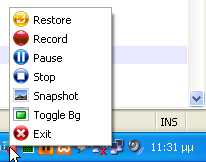
If you enable the "Hide to tray" option from the "General" tab then you can toggle the background from the tray menu too.
Now move to "Video" and select a compressor.
The recommended encoders for Screen2Avi are (This is an ordered by preference list) :
-
Lagarith
Lagarith is a free lossless video codec ideal for capturing.
Usually Lagarith is not installed on the computer.
Download Lagarith from here and install it
Now close Screen2Avi and re-run it.
Go to "Video" section and hit on the compression combobox. You should find the Lagarith voice.
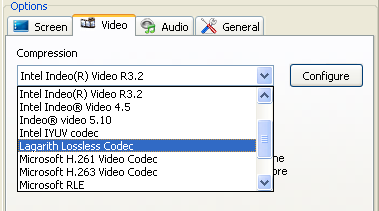
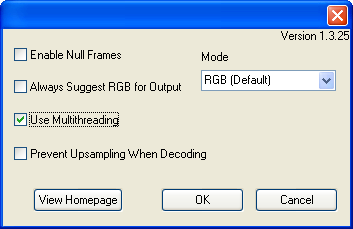
Press the configure button and check "Use multithreading" like the photo below.
-
FFDShow
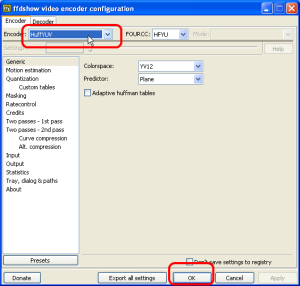
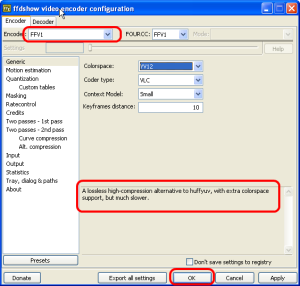
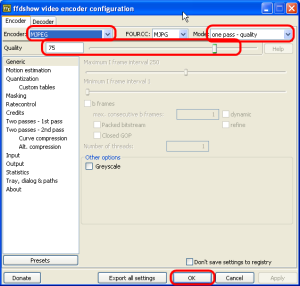
FFDShow is a codec pack that includes HuffYUV, FFV1, and MJPEG codecs.
All three of them are valid solutions for Screen2Avi. Download FFDShow from here or here
Once installed reload Screen2Avi.
Go to "Video" section and hit on the compression combobox. You should find the ffdshow voice.
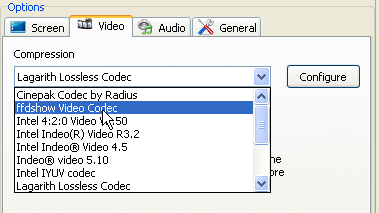
Press the configure button.
You can select between HuffYUV, FFV1, and MJPEG codec (keeping this preference order).
- Microsoft Video 1
Microsoft Video 1 is a video compression and decompression codec bundled with Windows so you no need any codec installation.
Go to "Video" section and hit on the compression combobox. You should find the "Microsoft Video 1" voice.
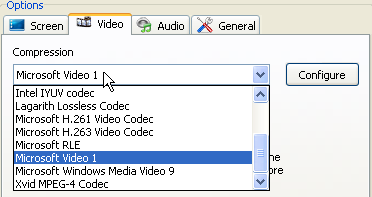
Now press the configure button.
Set temporal quality Ratio at 0,9 and hit ok.
More FPS means that more CPU is needed. For more informations take a look at the Resolve problems section below.
Remember that in order to change the FPS value you have to restart Screen2Avi.
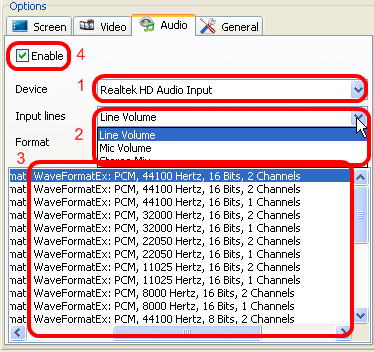
If you want to capture the audio too go to the "Audio" tab.
From the "Device" combobox select your audio harware device.
From the Input Lines combobox select your input source (microphone,line in etc...)
Now you can select the audio quality format.
PCM 44100 Herz 16 bits 2 channels
is a great option.
Remember to check the "Enable" checkbox as last step.
From the "General" tab you can select the general settings
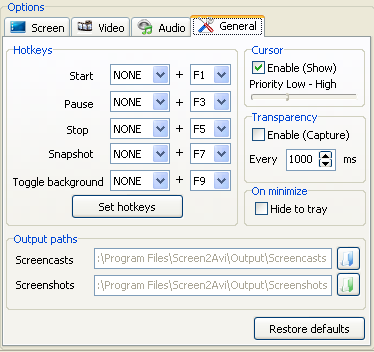
- You can set your hotkeys
Hotkeys are usefull when you capturing videos and you want to hide completely Screen2Avi. - Enable or disable the mouse capture
Notice that the mouse capture is emulated, so Screen2Avi will take a small amount of the CPU when this option is enabled (less than 1%). Using the slidebar you can set the priority of the emulated cursor process. (Left 0: Idle, 1: Normal, 2: High, 3: Real time right). The recommended option is Normal(1). - Enable the capture of the transparent windows.
Windows has the so called "layered windows". These kind of windows can not be captured. Screen2Avi by enabling the "Transparency" option every X ms scans all of your windows and changes your "layered-transparent" windows into normal windows so that can be captured. This option takes a little of CPU when is enabled. Smaller the amount of ms bigger the CPU load.
A value of 1000 ms is a good start (less than 2% of CPU). - Hide to tray
By enabling this option on minimize you are hiding Screen2Avi into your tray and not in the taskbar.
By hinding Screen2Avi into the tray you can get a nice menu by right-clicking the tray icon.
- Output paths
Set your output paths for your screencasts and for your screenshots.
The name for the screencasts will have a format like this :
Screencast_YYYY-MM-DD-HH-MM-SS.avi
Screencast_2011-07-07-23-38-47.avi
The name for the screenshots will have a format like this :
Screenshot_YYYY-MM-DD-HH-MM-SS.avi
Screenshot_2011-07-07-21-52-20.bmp
4) Usage
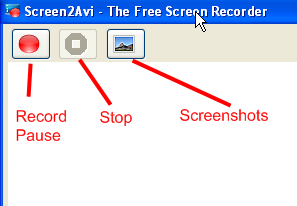
Just hit the record button to start recording and the stop button to stop recording.
When you recording the record button becomes pause button.
By hitting the screenshot button you capture and save as bitmap (bmp) the desired screenshot. You can take screenshots even if you are not recording.
Remember that you can also do these actions from the tray menu and from the dedicated Hotkeys defined by you at the "General" options tab.
5) Resolve problems
i)Slow/Fast Video and(or) Audio out of sync
Under Win7/Vista
a)Use Lagarith or HuffYUV as video compressor
or b)Decrease the fps from video options (set 5 or 10 fps)
or c)Decrease the dimension of your capture window if you can
or d)Disable Aero (yes this can be the problem! See the section 7 Mini tutorials for more info)
or e)All the above
Under XP
a)Use Lagarith or HuffYUV as video compressor
or b)Decrease the fps from video options (5-10 fps)
or c)Decrease the dimension of your capture window
or d)All the above
ii)I can not capture some windows (transparency problem)
Under Win7/Vista
a)Go to "General" and check the transparency option
or b)Enable Aero (See the section 7 "Mini tutorials" for more informations)
Under WinXP
Go to "General" and check the transparency option
iii) Videos are not captured (overlay problem)
Under Win7/Vista/WinXp
a)Use Media Player Classic
b)Use VLC
Go to tools -> preferences -> video -> disable overlay video output
c)Disable Hardware Acceleration (See the section 7 Mini tutorials for more info)
iv)I moved my portable Screen2Avi into a new computer and nothing works !
a) Close Screen2Avi
b) Delete settings.ini (or back up it like "settingsOLD.ini" in order to reuse it on your old pc)
c) Run Screen2Avi and select the video codec that you want.
v)I have uninstalled Screen2Avi under Vista/Win7 and when i reinstalled it remembers my old settings.
Go to :
C:\Users\[YOUR USERNAME]\AppData\Local\VirtualStore\Program Files (x86)\Screen2Avi
and delete the settings.ini . Now Screen2Avi does not remember anything.
Notice that all these solutions are ordered by importancy.
6) Known "bugs"
i) If you enable the "Transparency" option from general settings you have a "refresh" problem on your windows.
For now try or increasing the clock or disabling completely this option or if you are under Vista/Win7 try to enable aero.
If you refresh the windows the problem dissapears.
7) Mini Tutorials
i)Enable/Disable Aero under Win7
Right-click on the desktop and choose "Personalize" from the menu.
In order to disable Aero scroll the themes down until you see the "Basic themes" and select "Windows 7 Basic"
In order to enable Aero just select an Aero theme.
ii)Enable/Disable Aero under Vista
Aust right-click on the desktop and choose "Personalize".
Click the "Window Color and Appearance" link.
Then in the next screen, click the link "Open classic appearance properties for more color options"
In the "Appearence settings" window under "Color scheme" click "Windows Vista Basic" in order to disable Aero
or "Windows Aero" in order to enable Aero.
Hit apply and then Ok.
iii)Enable/Disable Hardware acceleration under Win7
Choose Start -> Control Panel.
Double click Personalization and select Display Settings.
Click Advanced Settings.
Click Change Settings on the Troubleshooting tab.
Move the Hardware Acceleration slider to None in order to disable the hardware acceleration or to "Full" in order to fully enable the hardware acceleration.
Click Apply and then click OK to accept the new setting and close the dialog box.
Click OK to close the Display Properties dialog box.
Restart Windows.
iv)Enable/Disable Hardware acceleration under Vista
Choose Start -> Control Panel.
In the Appearance and Personalization section, click "Adjust Screen Resolution".
Click "Advanced Settings".
On the "Troubleshooting" tab, click "Change Settings".
Move the Hardware Acceleration slider to None in order to disable the hardware acceleration or to "Full" in order to fully enable the hardware acceleration.
Click Apply and then click OK to accept the new setting and close the dialog box.
Click OK to close the Display Properties dialog box.
Restart Windows.
v)Enable/Disable Hardware acceleration under WinXp
Click on Start -> Control Panel.
In the classic view, double click on the Display icon.
Select the "Settings" tab and click on the Advanced button.
The "Advanced Settings" dialog box appears.
Click on the "Troubleshoot" tab.
You can disable the hardware acceleration completely by dragging the slider to the extreme left of the scale (None).
Enable the hardware acceleration by dragging the slider to the extreme right (Full).
Press Apply and then ok.
8) Conclusions
Now you have all the required knowledge to use Screen2Avi.
You are ready to make great quality screencasts !
