


STLBatch - Documentation
Official Online documentation for STLBatch.
Installation :
STLBatch Sorter is a portable application.
Just unzip the zip file into any folder you like.
Only limitation is to have writing privileges at the STLBatch folder.
Usage :
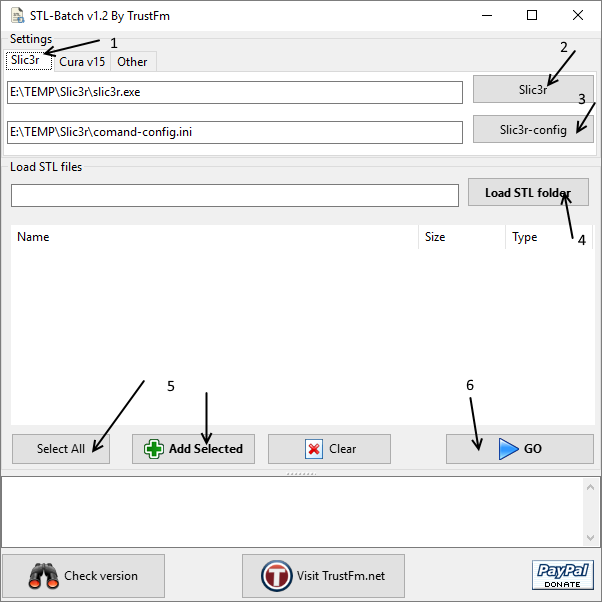
If you want to use Slic3r as slicer for your STL files proceed like this :
1) Hit the Slic3r tab
2) Click the Slic3r and find the slic3r.exe file on your system.
3) Click on the "Slic3r-config" burtton and load the "comand-config.ini".
STLBatch comes with a PLA configuration "comand-config.ini".
If you need other settings use Slic3r in order to generate your custom "comand-config.ini" using "File" > "Export Config" option 4) Put all your STL files into a single folder and click the "Load STL Folder" button.
5) Use "Select All" or "Add Selected" in order to add STL into your process list
6) Click the "Go" button in order to batch convert to gcode al your STL files.
If you want to use Cura 15.X.X as slicer for your STL files proceed like this :
1) Hit the "Cura" tab
2) Click the "Cura" button and find the "CuraEngine.exe" file on your system.
3) Click on the "Cura-profile" burtton and load the "cura-15-profile.ini".
STLBatch comes with a PLA configuration "cura-15-profile.ini".
If you need other settings use atext editor and edit "cura-15-profile.ini"
Unfortunately cura does not export any profiles.
4) Put all your STL files into a single folder and click the "Load STL Folder" button.
5) Use "Select All" or "Add Selected" in order to add STL into your process list
6) Click the "Go" button in order to batch convert to gcode al your STL files.

Below you can see a valid "cura-15-profile.ini" Cura profile
initialSpeedupLayers=4
minimalFeedrate=10
supportXYDistance=700
insetXSpeed=60
retractionZHop=0
extruderOffset[3].X=0
extruderOffset[3].Y=0
retractionSpeed=60
filamentFlow=100
max_acceleration[1]=9000000
infillOverlap=15
skinSpeed=20
inset0Speed=40
coolHeadLift=0
extrusionWidth=399
upSkinCount=4
initialLayerSpeed=20
max_xy_jerk=20000
minimalLayerTime=5
infillSpeed=60
supportExtruder=-1
fanSpeedMax=100
supportType=1
enableCombing=1
fanSpeedMin=100
supportZDistance=150
max_acceleration[3]=10000000
supportEverywhere=0
filamentDiameter=1720
initialLayerThickness=200
supportAngle=60
fanFullOnLayerNr=2
acceleration=3000000
extruderOffset[1].X=0
extruderOffset[1].Y=21600
layerThickness=200
minimalExtrusionBeforeRetraction=20
retractionMinimalDistance=2000
objectSink=0
retractionAmount=800
nozzleSize=400
skirtLineCount=3
max_acceleration[0]=9000000
skirtDistance=0
max_acceleration[2]=100000
extruderOffset[2].Y=0
extruderOffset[2].X=0
perimeterBeforeInfill=0
printSpeed=60
fixHorrible=1
layer0extrusionWidth=400
moveSpeed=150
max_z_jerk=400
supportLineDistance=2666
retractionAmountExtruderSwitch=16500
max_e_jerk=5000
sparseInfillLineDistance=1000
insetCount=3
downSkinCount=4
multiVolumeOverlap=150 -g 49674
posx=100000
posy=100000

startCode="""
M190 S40.000000
M109 S220.000000
;Sliced at: Fri 29-12-2017 02:16:58
;Basic settings: Layer height: 0.2 Walls: 1.2 Fill: 40
;Print time: #P_TIME#
;Filament used: #F_AMNT#m #F_WGHT#g
;Filament cost: #F_COST#
;M190 S40 ;Uncomment to add your own bed temperature line
;M109 S220 ;Uncomment to add your own temperature line
G21        ;metric values
G90        ;absolute positioning
M82        ;set extruder to absolute mode
M107       ;start with the fan off
G28 X0 Y0  ;move X/Y to min endstops
G28 Z0     ;move Z to min endstops
G1 Z15.0 F9000 ;move the platform down 15mm
G92 E0                  ;zero the extruded length
G1 F200 E3              ;extrude 3mm of feed stock
G92 E0                  ;zero the extruded length again
G1 F9000
;Put printing message on LCD screen
M117 Printing...
"""

endCode="""
;End GCode
M104 S0 ; turn off head
M140 S0 ; turn off bed
G91 ; relative movements
G1 Z5 ; Z up 5mm
G90 ; back to absolute
G28 X0 ; home X axis
G28 Y0 ; home Y axis
G1 Y200 ; Move Y axis at 200
M84     ; disable motors
;KnightRider
M300 S1318 P238
M300 S1396 P119
M300 S1318 P119
M300 S987 P476
M300 S2637 P238
M300 S2793 P119
M300 S2637 P119
M300 S987 P476
M300 S1318 P238
M300 S1396 P119
M300 S1318 P119
M300 S987 P238
M300 S2637 P238
M300 S2349 P952
M300 S0 P476
M300 S0 P952
M300 S1318 P238
M300 S1396 P119
M300 S1318 P119
M300 S987 P476
M300 S2637 P238
M300 S2793 P119
M300 S2637 P119
M300 S987 P476
M300 S1318 P238
M300 S1396 P119
M300 S1318 P119
M300 S987 P238
M300 S2637 P238
M300 S2793 P952
M300 S0 P952
"""

preSwitchExtruderCode="""
;Switch between the current extruder and the next extruder, when printing with multiple extruders.
;This code is added before the T(n)
"""
postSwitchExtruderCode="""
;Switch between the current extruder and the next extruder, when printing with multiple extruders.
;This code is added after the T(n)
;Info by TrustFm :
;Generated manually using Cura 15.04.06 by dropping an stl at the plate and then File -> show slice engine log...
"""
Tips :
1) By selecting the "Slic3r" tab you select Slic3r as batch slicer.
If you select the "Cura" tab then your batch slicer will become cura.
2) Other settings :
By checking "Auto-execute" STLBatch will create a bat file and then will execute it immediatelly.
If this setting is not enabled then STLBatch will create the bat file that you should launch it by yourself later.
The bat file is always generated at the same path as the "STLBatch.exe" is located with a formated name like this :
stl-batch-2018-01-07-04-05-11-158
3) Cura 15.04.06 can be found here
4) STLBatch does not work with cura 2.X.X nor 3.X.X