Configure a Dedicated Server with Webmin
Part 01 - Introduction
[[01-Introduction ]] - 02-Installing Webmin - 03-Configure DNS - 04-Assign Nameservers - 05-Configure SFTP - 06-Setup Web server - 07-Let's Encrypt - 08-Setup Perl/CGI PHP - 09-Manage MySQL - 10-Setup Email server - 11-Setup SASL - 12-Setup Email accounts - 13-Email process - 14-Email antivirus - 15-Usermin - 16-ExtrasEbook version 1.3
Author: Karydis Anastasios aka TrustFm
Date: 07/Giu/2016
We have seen how you can get a free web domain and a free or paid shared hosting.
There are some cases that a free hosting but even a paid shared hosting like Bluehost or Hostgator can not cover you.
A dedicated server is way more performant than a shared hosting.
Your web site or web application would be on a dedicated machine so will have it's own unique IP address.
Some of the advantages of a dedicated solution are speed and reliability.
The cost of a dedicated server is not irrelevant.
Dedicated servers can be managed or unmanaged.
Managed solutions usually have a technician in order to set up and manage your server.
An unmanaged server cost way less than a managed one since the datacenter only sets up the hardware, connect the server to the internet and assigns the IPs.
Your tasks are : configure the server, install programs and servers, add your firewall, backup your data etc...
Some cheap unmanaged dedicated hosting solutions that i know are listed below : From the above list i have only experience with Kimsufi.
I do not have any connection with any of the companies listed above.
If you have an economic recommendation let me know via email.
This ebook is based on the KS-2B dedicated plan that have with Kimsufi.
The KS-2B has these characteristics :
- CPU : Atom™ N2800 (64-bit)
- Average CPU Mark : 627
- Dual Core / Quad Thread
- Freq : 1.86 GHz+
- RAM : 4GB
- HD : 40 Gb SSD
- Network : 100 Mbps
- Bandwith : Unmetered
- IPs : One
The downside of a unmanaged dedicated solution is that for a common user is an intimidating solution.
With these series of articles i will cover how an inexpert user even with no knowledge in Linux can manage a dedicated server by himself.
For simplicity in this ebook we will use these values as examples :
Server Main IP : 111.111.111.111
SSH Port : 22
www.website1.com
email1@website1.com
email2@website1.com
www.website2.com
email1@website2.com
email2@website2.com
If you want to create a subdomain just treat the subdomain as another new domain.
www.subdomain.website1.com
email1@subdomain.website1.com
email2@subdomain.website1.com
SSH Port : 22
www.website1.com
email1@website1.com
email2@website1.com
www.website2.com
email1@website2.com
email2@website2.com
If you want to create a subdomain just treat the subdomain as another new domain.
www.subdomain.website1.com
email1@subdomain.website1.com
email2@subdomain.website1.com
Let's start !
OS Installation
Once you get a dedicated server they will contact you via email saying :
"Server no.X has been installed"
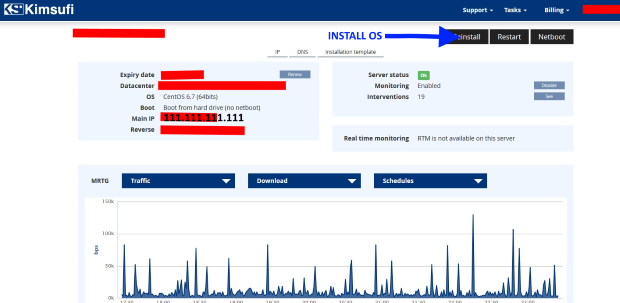
You can now go to your control panel to install your choice of operating system.
Kimsufi manager
You can now go to your control panel to install your choice of operating system.
Kimsufi manager
Use your email and your given password in order to log in at your online manager.
Using Kimsufi manager install your preferred OS.

We will use CentOS 6.7 64 bit version since we have an 64 bit processor.
We have chosen this option since it is the most popular free OS on the dedicated hosting, is easy to use, reliable and the end-of-life circle for any CentOS distro is 5 years.
If for any reason you do not like CentOS as operating system my second recommendation is Debian.
Avoid using Ubuntu as server.
Once you have installed remotely your operating system (several remote reboots will needed) another email should arrive like this one below :
"Server no.X has been installed"
Your server is installed in CentOS 6.7.
This distribution is based on a 64 bit system.
Please find your server's connection settings below.
SERVER SETTINGS:
IP address: 111.111.111.111
Server name: your-server-name
(Active in up to 48hrs time)
The following root account has been configured on the server:
Username: root
Password: rootpassword
From this email you should save in a safe place like VaultPad three important informations:
Server IP, System Username & System Password.
You are now ready to access remotely at your dedicated server.
Let's see how.
Connect via connect SSH using PuTTY
Secure SHell, also called SSH, is an encrypted network protocol that allows a user with an unsecured network connection to remotely login and do other network services securely.SSH is the safest way to talk remotely with your dedicated server.
In order to connect with your server via SSH we are going to use PuTTY.
PuTTY works under Windows, Linux and Mac
Launch PuTTY and :
Fill your IP address (ex :111.111.111.111)
Port : 22
Connection type : SSH
Port : 22
Connection type : SSH
Click the "Open" button like the photo below :

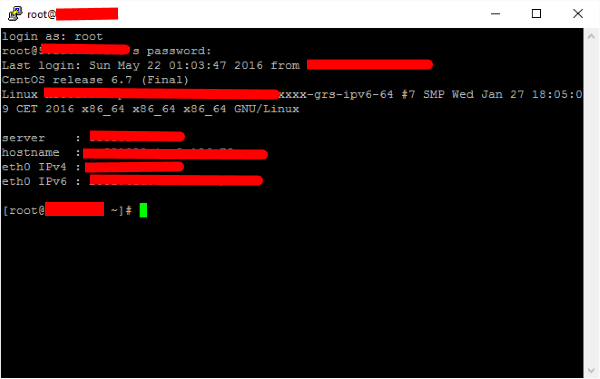
Once connected fill the login name (root) and hit the ENTER key.
Give your root password and hit the ENTER key again.
If your password is complicated copy it normally and using the mouse on the black console window right-click where the green cursor block is (this action equals to paste). Now hit ENTER.

You should have been logged.
Congratulations !
In the next section we will see how to install Webmin on our dedicated server using PuTTY.
[[01-Introduction ]] - 02-Installing Webmin - 03-Configure DNS - 04-Assign Nameservers - 05-Configure SFTP - 06-Setup Web server - 07-Let's Encrypt - 08-Setup Perl/CGI PHP - 09-Manage MySQL - 10-Setup Email server - 11-Setup SASL - 12-Setup Email accounts - 13-Email process - 14-Email antivirus - 15-Usermin - 16-Extras