Configure a Dedicated Server with Webmin
Part 09 - MySQL
01-Introduction - 02-Installing Webmin - 03-Configure DNS - 04-Assign Nameservers - 05-Configure SFTP - 06-Setup Web server - 07-Let's Encrypt - 08-Setup Perl/CGI PHP - [[ 09-Manage MySQL ]] - 10-Setup Email server - 11-Setup SASL - 12-Setup Email accounts - 13-Email process - 14-Email antivirus - 15-Usermin - 16-ExtrasMySQL Installation
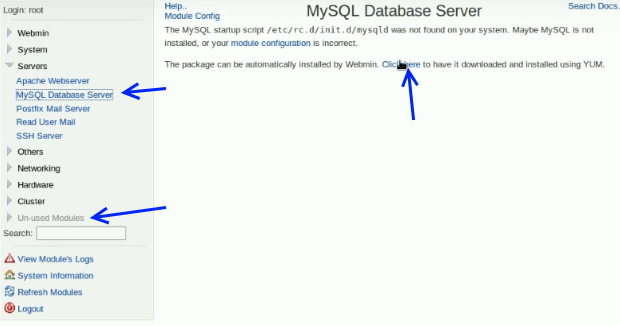
MySQL is a popular open source software used for creating relational databases.Using Webmin you can install the "MySQL Database Server".
Notice that Webmin can configure also MariaDB and PostgreSQL databases but we will focus only on MySQL in this ebook.
"MySQL Database Server" should be located at "Servers" or "Un-used Modules" section.
MySQL Configuration
Once finished the installation make sure that on start-up of our dedicated server the DB server also starts.So go to System > Bootup and Shutdown.
Check the "mysqld" checkbox and press the "Start Now and On Boot" button.

Now go to Servers > MySQL Database Server.
Click the "Start" button in order to start the database server.
Now click the link "Create a new database".
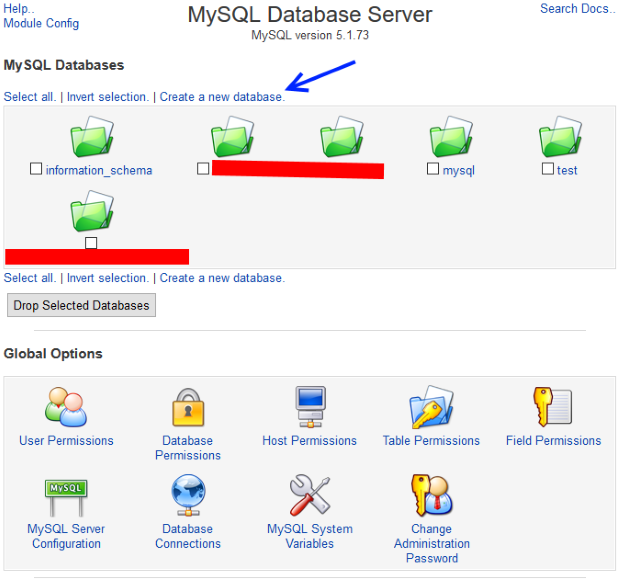
Each website can have multiple databases.
It is always good practice to give a database name that is related at the website, so for our website1.com example we can create databases named : website1db1, website1db2 and so on...
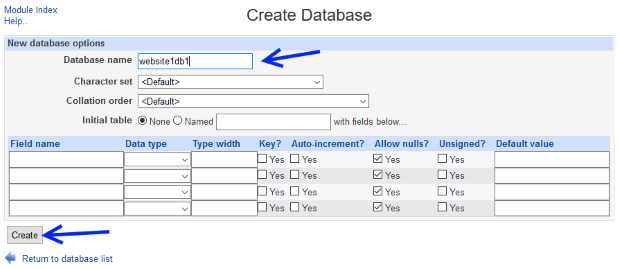
So back into our example, we fill the "Create Database" page like this :
Database name: website1db1
Leave the other options to their default values.
Leave the other options to their default values.
Hit the "Create" button.
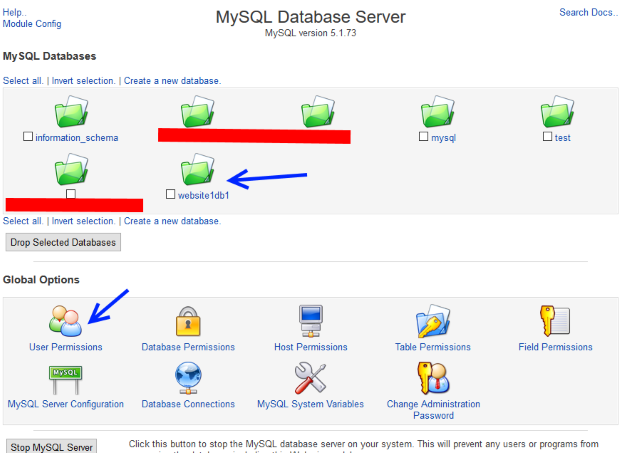
Always from Servers > MySQL Database we should be able to see our newly created database called website1db1 under "MySQL Databases" list.
We have to create a new user for our newly created DB.
It is recommended to have one user per database.
Each database user must have his own unique secure password.
So for the website1db1 should create the userwebsite1db1,
for the website1db2 should create the userwebsite2db and so on ...
Click over the "User Permissions" icon.
Click over "Create new user" link.
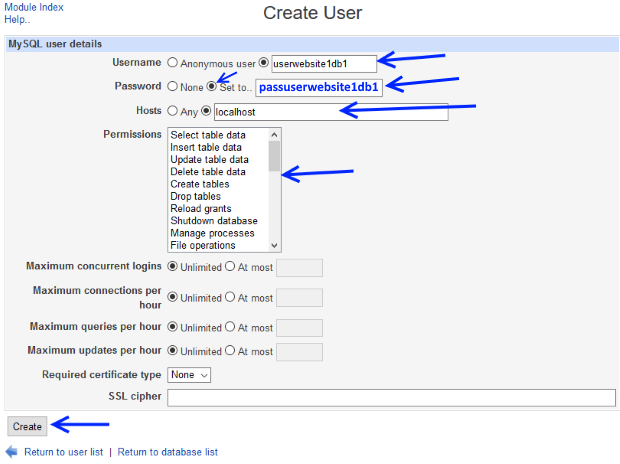
Fill the "Create User" form like this :
Username : userwebsite1db1
Password : Click the Set to... radio button.
Give a unique user db password, in our example will be passuserwebsite1db1.
Hosts : Check the radio button at the left of the empty text field. Write in that field : localhost
Permissions None Un-select all.
Leave the other fields to their default values.
Press the "Create" button.
After the user creation Webmin will lead you at the "User Permissions" page where you should have the newly created user userwebsite1db1 like the picture below.
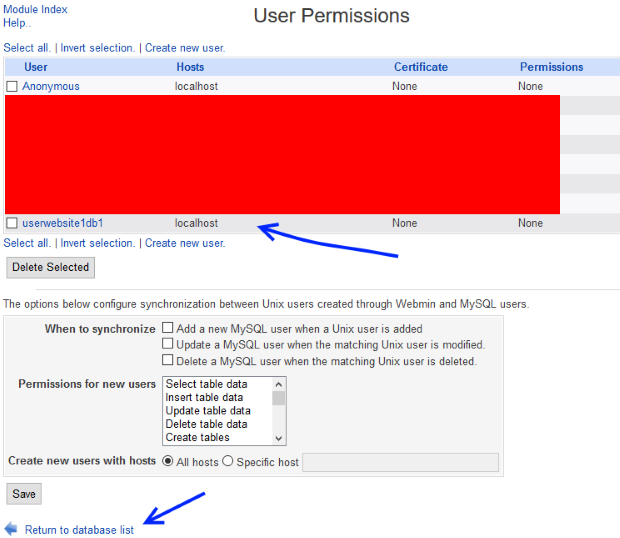
Click at the "Return to database list" list located at the bottom of the page.
Finally we have to assign the userwebsite1db1 user at our website1db1 database.
Click at the "Database Permissions" icon.
Hit the link "Create New Database Permissions."
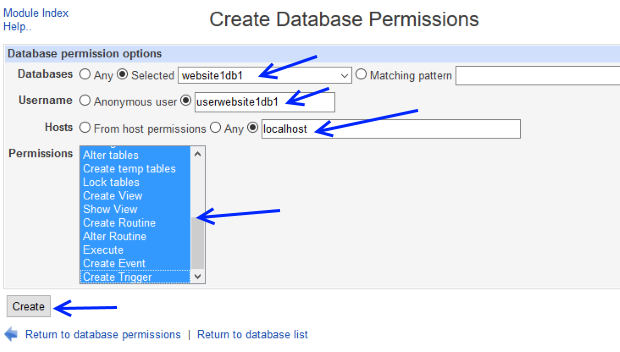
Now fill the "Create Database Permissions" form like this :
Databases : selected website1db1
Username : userwebsite1db1
Host : localhost
Permissions : ALL (use the CTRL key in order to enable multi-select)
Username : userwebsite1db1
Host : localhost
Permissions : ALL (use the CTRL key in order to enable multi-select)
Hit the "Create" button.
Into the "Database Permissions" list should appear the connection between user and database.
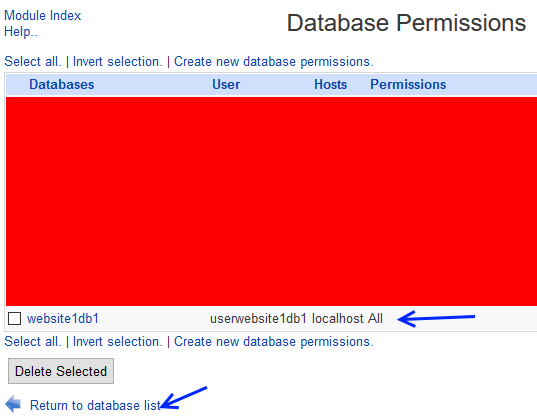
Click at the "Return to database list" list located at the bottom of the page.
At this point we have finished with MySQL setup and configuration.
From now on you can use Webmin in order to create new databases and new users for your databases.
phpMyAdmin Installation
phpMyAdmin is a tool written in PHP intended to handle the administration of MySQL database over the web.This step is optional since you can administer your databases using Webmin (Servers > MySQL Database Server) but many web developers use phpMyAdmin at daily basis.
Also a great alternative is adminer.
We will focus on phpMyAdmin since it is the most popular.
Log in using PuTTY and give :
yum install phpmyadmin
phpMyAdmin should be installed at your dedicated server.
phpMyAdmin Configuration
In order to configure phpMyAdmin log in using Webmin and go to: Severs > Apache Webserver.Press over "Global configuration" tab link and then click at "Edit Config Files" icon.
Select /etc/httpd/conf.d/phpMyAdmin.conf from the drop list and click the "Edit Directives in File :"
Do the changes like below :
<Directory /usr/share/phpMyAdmin/>
   AddDefaultCharset UTF-8

   <IfModule mod_authz_core.c>
     # Apache 2.4
     <RequireAny>
      # Require ip 127.0.0.1
      # Require ip ::1
        Require all granted
     </RequireAny>
   </IfModule>
   <IfModule !mod_authz_core.c>
     # Apache 2.2
     Order Deny,Allow
     #Deny from All
     Allow from 127.0.0.1
     Allow from ::1
   </IfModule>
</Directory>

Press the "Save" button and then click the "Return to global configuration" bottom link.
Stop and then Start Apache from the top right link in order to restart Apache.
For being able to test your phpMyAdmin make sure you have made a Virtual Host of your website1.com domain over the 443 port.
Connect using https :
https://www.website1.com/phpmyadmin/
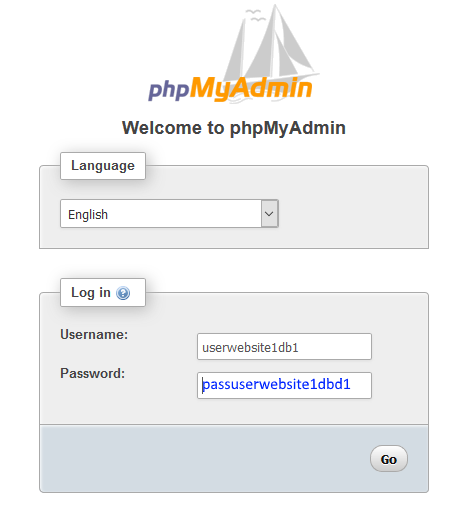
At the phpMyAdmin login page use :
Username: userwebsite1db1
Password: passuserwebsite1db1
Password: passuserwebsite1db1
Finally press the "Go" Button.
Fill your database using phpMyAdmin
These steps are optional but since we always want to test every aspect of our server is recommended to proceed.Any database stores the data into tables.
Each table has columns, each column can be seen as individual attribute of the table.
In our testing DB example we will create a single table called persons.
Every person has an id(INT) a name(VARCHAR) a surname(VARCHAR) and an age(INT).
The id of the person should be unique , not null and auto-incremented.
So the persons table should have four columns.
Each row of persons table contain a different person.
With these informations in mind we can create the table called persons using phpMyAdmin.
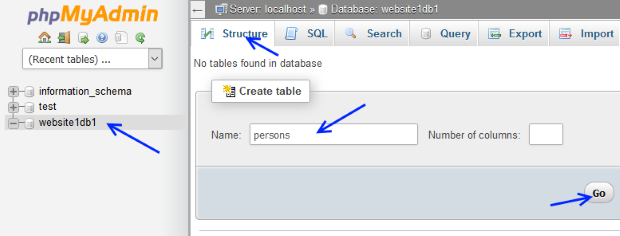
Select website1db1 and then click over the "Structure" tab.
Now under "Create table" give as Name : persons and press the "Go" button in order to create your first table.
In the next page we should define our table structure (the columns).
We fill like the icon below :

Notice the Index: PRIMARY and the checked A_I (auto increment) at the id line.
Hit the "Save" button.
Once our structure is made it is time to fill the table (rows) with our data.
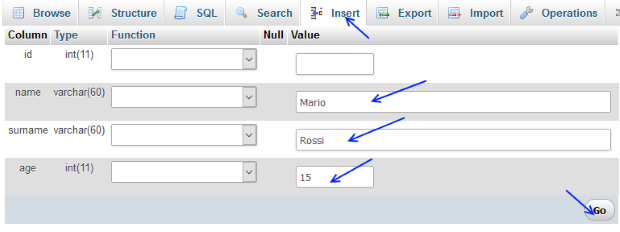
The ID field is not needed to be filled since our db auto increment's it.
So insert rows by clicking over the "Insert" tab and add some persons into the DB.
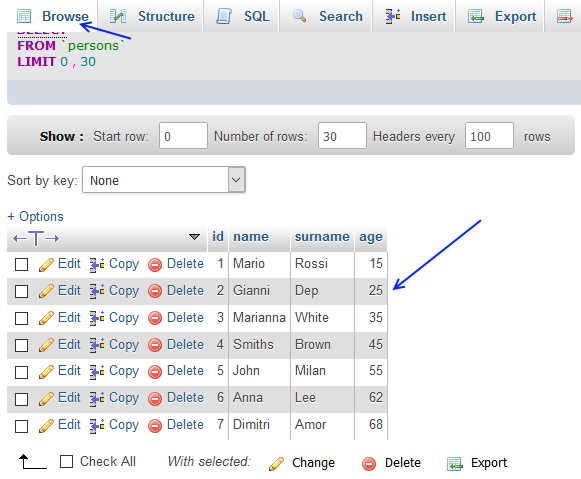
Insert some random persons with different ages, i have used :
1 Name : Mario, Surname : Rossi, Age : 15
2 Name : Gianni, Surname : Dep, Age : 25
3 Name : Marianna, Surname : White, Age : 35
4 Name : Smiths, Surname : Brown, Age : 45
5 Name : John, Surname : Milan, Age : 55
6 Name : Anna, Surname : Lee, Age : 62
7 Name : Dimitri, Surname : Amor, Age : 68
You can see all of your inserted persons by clicking the "Browse" tab.
We have finished updating our database using phpMyAdmin.
At this point worth mentioning again that the same actions could have been done with Webmin itself but also you could use adminer.
I personally like adminer more than phpMyAdmin since it is easier to configure.
Just download the single "adminer.php" file and upload it using FileZilla at your server.
Create a dedicated folder for adminer.
Ex : /home/sftpwebsite1/adminer.
You can access adminer from the URL :
https://www.website1.com/adminer/adminer.php
So if you have problems with phpMyAdmin try adminer instead.
Testing DB using PHP
We can test our database by using a PHP script.Create a new empty document with your favourite text editor and call it "testdb.php"
The script below queries our database and finds the persons that are older from X years.
Copy and paste the code below :
<?php

	//MODIFY :
	/////////////////////////////////////////////////////////////
	//DB settings :
	$hostname = 'localhost';
	$databasename = 'website1db1';
	$username = 'userwebsite1db1';
	$password = 'passuserwebsite1db1';


	//DO NOT MODIFY FROM THIS LINE AND BELOW :
	$connection;
	/////////////////////////////////////////////////////////////
	//DB Functions :
	function check_input($value, $filter) {

		//filter_var : remove tags and remove or encode special characters
		$value = filter_var($value, $filter);

		//stripslashes : Remove the backslashes '\'
		if (get_magic_quotes_gpc()) {
			$value = stripslashes($value);
		}

		//Characters encoded are NUL (ASCII 0), \n, \r, \, ', ", and Control-Z.
		global $connection; //Use the global declared $connection variable
		$value = mysqli_real_escape_string($connection, $value);

		return $value;

	}

	function Connect() {
		global $hostname, $username, $password, $databasename, $connection;
		$connection = mysqli_connect($hostname, $username, $password, $databasename)
			or die("Unable to connect to database!");
	}

	function Disconnect() {
		global $connection;
		mysqli_close($connection);
	}

	function MakeAQuery($query) {
		global $connection;
		$result = mysqli_query($connection,$query)
			or die("Error: " . mysqli_error($connection));
		return  $result;
	}

	/////////////////////////////////////////////////////////////
	//Page creation :
	function printHeader() {
		print '<html>' . PHP_EOL;
		print '<head>' . PHP_EOL;
		print '<title>Test DB</title>' . PHP_EOL;
		print '</head>' . PHP_EOL;
		print '<body>' . PHP_EOL;
		print '<a href="testdb.php">Start page</a> <br>' . PHP_EOL;
		print '<a href="testdb.php?age=10">Find persons older than 10 years</a> <br>' . PHP_EOL;
		print '<a href="testdb.php?age=25">Find persons older than 30 years</a> <br>' . PHP_EOL;
		print '<a href="testdb.php?age=50">Find persons older than 50 years</a> <br>' . PHP_EOL;
		print '<a href="testdb.php?age=70">Find persons older than 70 years</a> <br>' . PHP_EOL;
	}

	function printFooter() {
		print '</body>' . PHP_EOL;
		print '</html>' . PHP_EOL;
	}

	/////////////////////////////////////////////////////////////
	//main program :
	printHeader();

	if (isset($_GET["age"])) {

		Connect();

		$age = $_GET["age"];
		$age_filtered = check_input($age,FILTER_SANITIZE_NUMBER_INT);
		if ($age_filtered==$age){

			$query =  "SELECT name, surname, age ";
			$query .= "FROM persons ";
			$query .= "WHERE age > '$age_filtered' ";
			$query .= "ORDER BY age ASC";

			$query_result = MakeAQuery($query);

			$num_rows = mysqli_num_rows($query_result);
			$count = 0;
			if ($num_rows>0){

				while($row = mysqli_fetch_array($query_result , MYSQLI_ASSOC)) {
					$name = $row['name'];
					$surname = $row['surname'];
					$age = $row['age'];
					$count++;
					print $count . " Name : " . $name . ", Surname : " .
					      $surname . ", Age : " . $age  . "<br>";
				}

			} else {
				print "No persons found.";
			}

		} else {
			print "Invalid age value";
		}

		Disconnect();

	}

	printFooter();

?>
Even if you do not know PHP the script is self explanatory.
Change only databasename, username and password variables located at the top of the script.
In order to test your DB upload the "testdb.php" via SFTP using FileZilla at the root of your website1 (/home/sftpwebsite1/).
Now navigate at the page : http://www.website1.com/testdb.php
If everything works you should see a page like this one below :
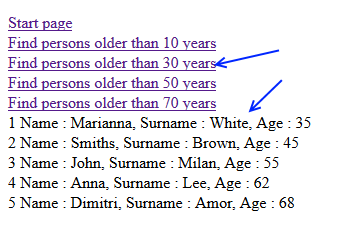
By clicking the various links you should get the persons with older than X age.
In the next chapter we will find out how to set up our Email server.
01-Introduction - 02-Installing Webmin - 03-Configure DNS - 04-Assign Nameservers - 05-Configure SFTP - 06-Setup Web server - 07-Let's Encrypt - 08-Setup Perl/CGI PHP - [[ 09-Manage MySQL ]] - 10-Setup Email server - 11-Setup SASL - 12-Setup Email accounts - 13-Email process - 14-Email antivirus - 15-Usermin - 16-Extras