Configure a Dedicated Server with Webmin
Part 11 - Email SASL Authentication
01-Introduction - 02-Installing Webmin - 03-Configure DNS - 04-Assign Nameservers - 05-Configure SFTP - 06-Setup Web server - 07-Let's Encrypt - 08-Setup Perl/CGI PHP - 09-Manage MySQL - 10-Setup Email server - [[ 11-Setup SASL ]] - 12-Setup Email accounts - 13-Email process - 14-Email antivirus - 15-Usermin - 16-ExtrasSimple Authentication and Security Layer (SASL) is a technology for authentication and data security in Internet protocols. We will use SASL in order to authenticate Postfix.
Setup a SASL authentication
We will use a combination of Postfix and Dovecot to set up SASL authentication for your SMTP server.We will set up a TLS encryption for SMTP connections.
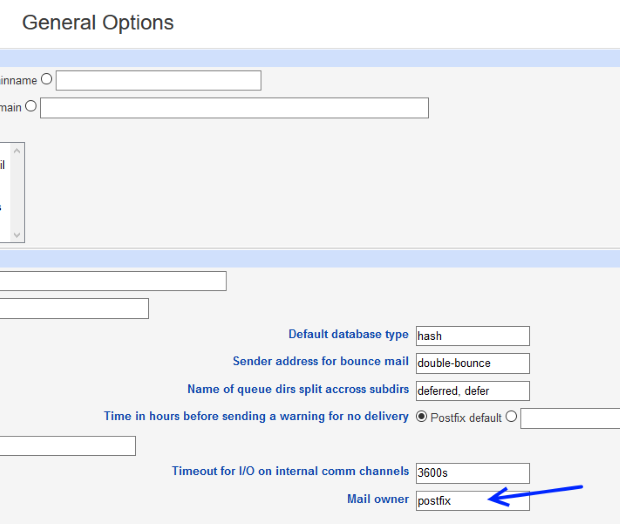
Using Webmin navigate to Servers > Postfix Mail Server and click on the "General Options" icon.
Make a note of the "Mail owner" value, this is the Postfix user name (should be : postfix).
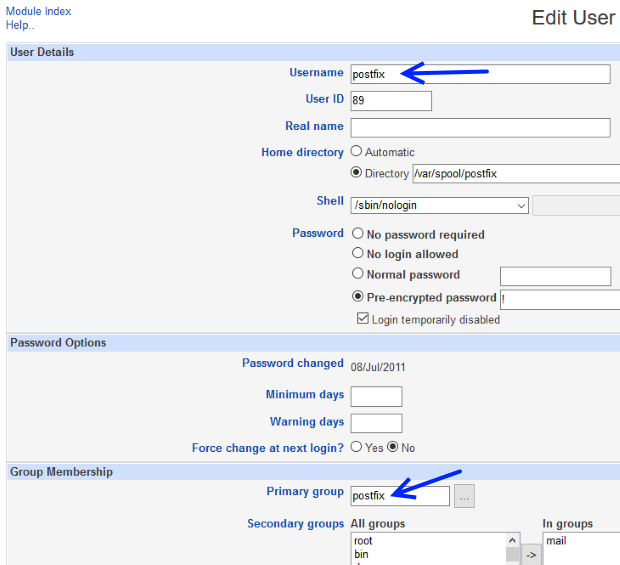
Now go to System > Users and Groups, and check the primary group of this user (should be : postfix).
Time to setup a secure SMTP relay for any email user.
Go to Servers > Postfix Mail Server and click over the "SMTP Authentication And Encryption" icon
Fill the "SMTP Authentication And Encryption" page like this :
Set Require SASL SMTP authentication? to Yes.
Set Disallow SASL authentication over insecure connections? to Yes.
Set Handle non-compliant SMTP clients? to Yes.
Under SMTP security options, check the box labeled Reject anonymous logins.
Under "SMTP relaying restrictions", check the boxes :
Allow connections from same network
Allow authenticated clients
Reject email to other domains
Set Enable TLS encryption? to If requested by client.
You should use the same SSL certificate that the Dovecot server uses.
So in our case we have to use :
"TLS certificate file": /etc/pki/dovecot/certs/dovecot.pem
"TLS private key file": /etc/pki/dovecot/private/dovecot.pem
"TLS certificate authority file" : None
Use SASL SMTP authentication? No
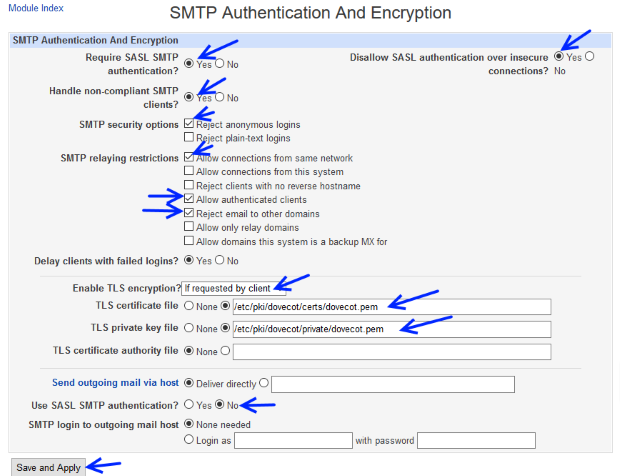
Click "Save and Apply" button.
Postfix edit config files
Go to Servers > Postfix Mail Server and click over the "Edit Config Files" icon.Select main.cf from the "Edit config file" dropdown box.
Click the "Edit" button.
Scroll down to the end of the configuration file, and add the following settings:
smtpd_sasl_type = dovecot
smtpd_sasl_path = private/auth
smtpd_sasl_path = private/auth
Also make sure you have exactly this line into your main.cf file :
smtpd_recipient_restrictions = permit_sasl_authenticated, permit_mynetworks, reject_unauth_destination permit_sasl_authenticated

Finally also at the same file (at the middle of the file this time) uncomment the line :
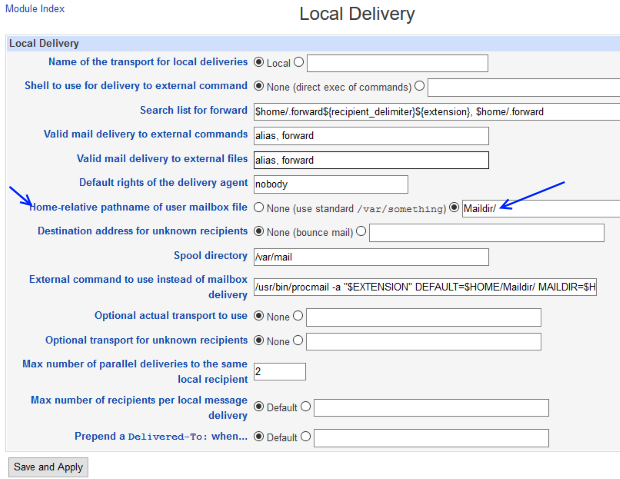
home_mailbox = Maildir/
Click the "Save" button.
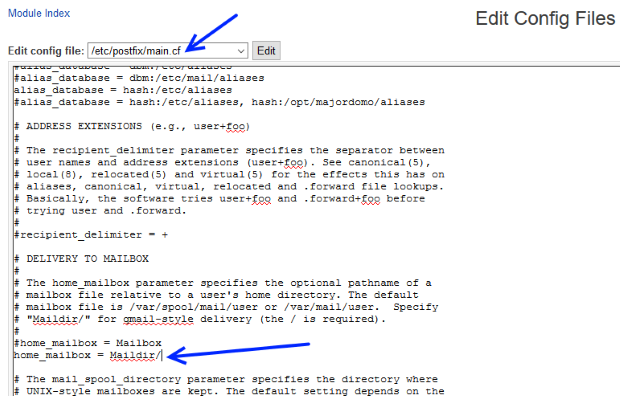
Notice that for the last setting we could have done it by navigating at Server > Postfix Mail Server, and by clicking at "Local delivery" icon and by setting Maildir/ at the voice "Home-relative pathname of user mailbox file".
Dovecot edit config files
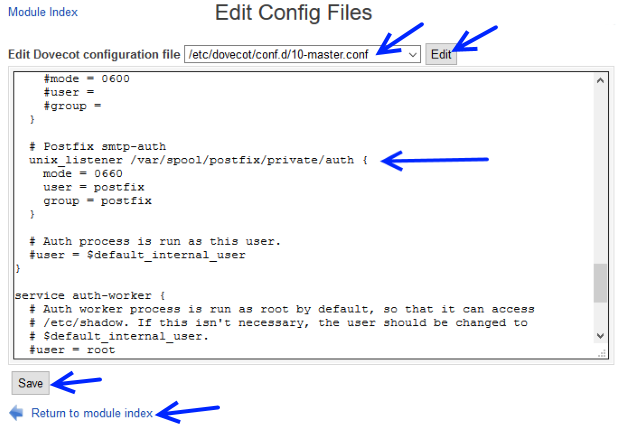
Navigate to Servers > Dovecot IMAP/POP3 Server and click over the "Edit Config Files" icon.Select /etc/dovecot/conf.d/10-master.conf from the "Edit config file" dropdown.
Click the "Edit" button.
Find the configuration section for the auth service, and uncomment lines related to the socket. Specify the username and group name of your Postfix user.
In our case is user=postfix, group = postfix.
The section should look something like the following code when finished:
service auth
{
...
 # Postfix smtp-auth
 unix_listener /var/spool/postfix/private/auth
 {
 mode = 0660
 user = postfix
 group = postfix
 }
...
}
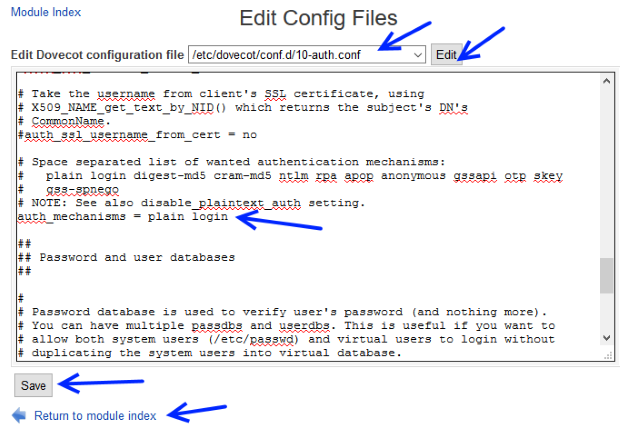
Now go to file : /etc/dovecot/conf.d/10-auth.conf and hit the "Edit" button.
Find and change auth_mechanisms to :
auth_mechanisms = plain login
Click "Save".
Click the "Stop Dovecot Server" button and then the "Start Dovecot Server" button to restart the dovecot daemon.
Set Postfix to listen at Port 587
We need to instruct Postfix to listen for SMTP connections on port 587.Navigate to Servers > Postfix Mail Server and click at the "Server Processes" icon.
Click the "Add a new server process" link.
In the "Create Server Process" form fill like this :
Set "Transport type" to Internet.
Set Server name/port" to 587.
Set "Process command" to smtpd.
Set "Enabled?" to Yes.
Set "Listen on host address" to Any address.
Set "Private to mail system?" to No.
Set Server name/port" to 587.
Set "Process command" to smtpd.
Set "Enabled?" to Yes.
Set "Listen on host address" to Any address.
Set "Private to mail system?" to No.
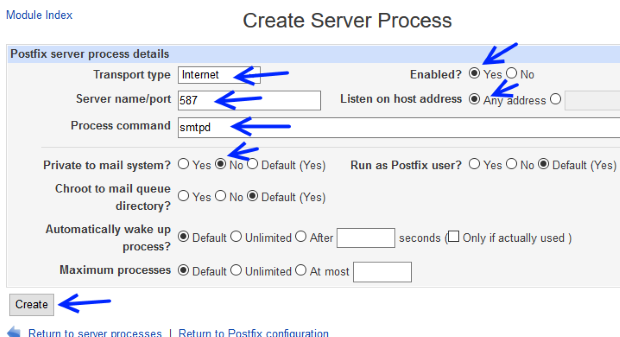
Click the "Create" button.
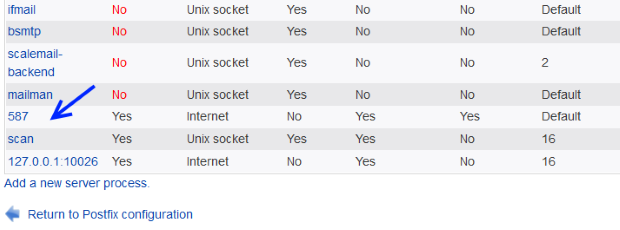
At the "Server Processes" list you should have a new process with name 587 like the picture below.
Navigate to Servers > Postfix Mail Server.
Click "Stop Postfix" and then "Start Postfix" to restart the service.
In the next section we will demonstrate how we can create email accounts.
01-Introduction - 02-Installing Webmin - 03-Configure DNS - 04-Assign Nameservers - 05-Configure SFTP - 06-Setup Web server - 07-Let's Encrypt - 08-Setup Perl/CGI PHP - 09-Manage MySQL - 10-Setup Email server - [[ 11-Setup SASL ]] - 12-Setup Email accounts - 13-Email process - 14-Email antivirus - 15-Usermin - 16-Extras