Configure a Dedicated Server with Webmin
Part 08 - Perl/CGI and PHP
01-Introduction - 02-Installing Webmin - 03-Configure DNS - 04-Assign Nameservers - 05-Configure SFTP - 06-Setup Web server - 07-Let's Encrypt - [[ 08-Setup Perl/CGI PHP ]] - 09-Manage MySQL - 10-Setup Email server - 11-Setup SASL - 12-Setup Email accounts - 13-Email process - 14-Email antivirus - 15-Usermin - 16-ExtrasPerl/CGI
Perl is a programming language especially designed for text processing.Webmin uses Perl so it is already installed on our server.
A CGI script is any program that runs on a web server.
Create a new file called "hello.pl".
Let's write the hello world program written in Perl inside the "hello.pl".
#!/usr/bin/perl -wT
print "Content-type: text/html\n\n";
print "Hello, world!\n";
print "Content-type: text/html\n\n";
print "Hello, world!\n";
Connect via SFTP using FileZilla.
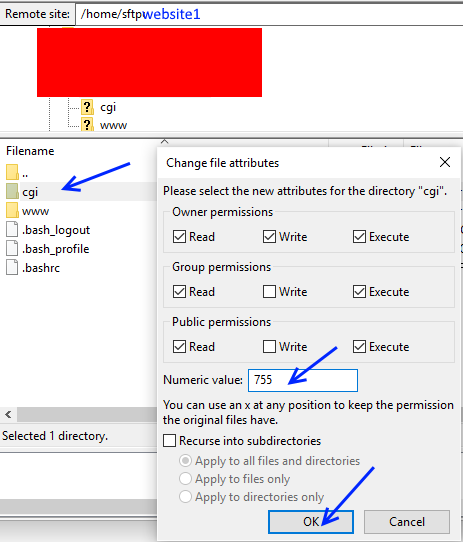
Create a new folder called cgi into the root of your selected website that you want to enable CGI scripts.
Ex : /home/stfpwebsite1/cgi
Make sure that you set the permissions of cgi folder to 755.
This setting can be done using FileZilla client.
Right-click the cgi folder and click "File permissions..."

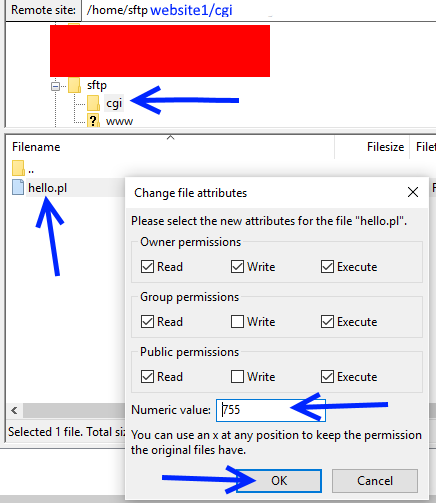
Upload the file "hello.pl" into the cgi folder.
Make sure that also the pl file has permissions 755.

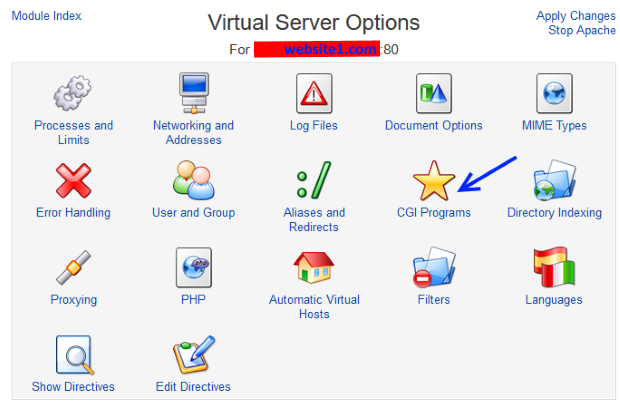
Using Webmin go to Servers > Apache Webserver.
From the "Existing virtual hosts" list select your Virtual server that you want to enable CGI scripts.
In our case is "website1 Port 80".
Now click over the "CGI Programs" icon.

At the "CGI Programs" page, under the voice "CGI Programs for website1.com:80" do :
At the "CGI directory aliases" label, fill "From" field like this : /cgi/
and "To" field like this : /home/sftpwebsite1/cgi/
and "To" field like this : /home/sftpwebsite1/cgi/
Do not forget to press the "Save" button located at the bottom of the page.

Now click the "Apply changes" link located at the top right of the page.
Test if your script runs "server side" by using the link :
http://www.website1.com/cgi/hello.pl
If you get "Hello, world!" on your browser you are good to go!
A good starting point for learning Perl is going at : learn.perl.org
PHP
PHP also know as Hypertext Preprocessor, is a server-side scripting language designed for web development.PHP is more suitable for web applications than Perl since Perl was born way before the web era.
In order to install PHP in our dedicated server we have to log in using PuTTY and give the following two commands:
yum install php php-gd php-mysql php-mcrypt
yum install php-devel php-pecl-memcache php-pspell php-snmp php-xmlrpc php-xml php-mbstring
yum install php-devel php-pecl-memcache php-pspell php-snmp php-xmlrpc php-xml php-mbstring
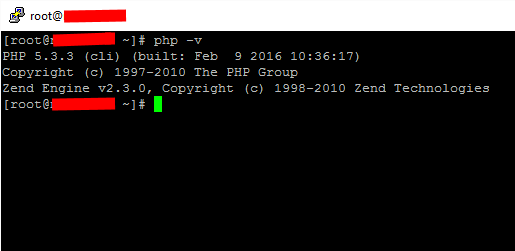
In order to test if the PHP is installed give the command :
php -v
You should get your current PHP version.

Once installed PHP log in to Webmin and go Servers > Apache Webserver and press the "Stop Apache" link located at the right top of the page and then click the "Start Apache" link in order to restart Apache.
Now create a new empty text file called "phpinfo.php".
Write the line below using a text editor like notepad.
<?php print phpinfo(); ?>
Save the file.
The phpinfo() command prints a HTML page showing all the information of your PHP installation.
Upload "phpinfo.php" using FileZilla at the path : /home/sftpwebsite1/www
Test your installation using the link :
http://www.website1.com/phpinfo.php
You should get the PHP Info page like below :

From the main navigation menu of Webmin by clicking "Others" > "PHP Configuration" you can edit the famous "php.ini" file.
Configuring this file is beyond the scope of this ebook.
If you want to learn PHP a great starting point is www.w3schools.com/php
In the next section we will discover how to install and manage MySQL databases.
01-Introduction - 02-Installing Webmin - 03-Configure DNS - 04-Assign Nameservers - 05-Configure SFTP - 06-Setup Web server - 07-Let's Encrypt - [[ 08-Setup Perl/CGI PHP ]] - 09-Manage MySQL - 10-Setup Email server - 11-Setup SASL - 12-Setup Email accounts - 13-Email process - 14-Email antivirus - 15-Usermin - 16-Extras