Configure a Dedicated Server with Webmin
Part 14 - Email Antivirus
01-Introduction - 02-Installing Webmin - 03-Configure DNS - 04-Assign Nameservers - 05-Configure SFTP - 06-Setup Web server - 07-Let's Encrypt - 08-Setup Perl/CGI PHP - 09-Manage MySQL - 10-Setup Email server - 11-Setup SASL - 12-Setup Email accounts - 13-Email process - [[ 14-Email antivirus ]] - 15-Usermin - 16-ExtrasBefore installing an antivirus at your email server i need to point out that it it not 100% necessary.
Also take notice that any antivirus will take a lot of resources. I noticed that ClaimAV took 400 MB more of RAM.
A lot of web hosting providers are not offering email antivirus protection.
Anyway in our session we will install ClamAV.
Install ClamAV
Log in at your system using PuTTY in order to add the EPEL repository at your system.The EPEL repository is enabled by simply installing an RPM.
Please use the command below to install the EPEL repository on your CentOS server.
For CentOS 6 – 32-bit:
rpm -Uvh http://mirror.overthewire.com.au/pub/epel/6/i386/epel-release-6-8.noarch.rpm
For CentOS 6 – 64-bit (our case senario):
rpm -Uvh http://download.fedoraproject.org/pub/epel/6/x86_64/epel-release-6-8.noarch.rpm
Install required ClamAV packages using the command below:
yum install clamav clamd clamsmtp
Update ClamAV using:
yum update clamav
Update ClamAV virus DB:
freshclam
Configure ClamAV
Using Webmin go to Others > File Manager.Click over the search button indicated at the photo below. Fill the Search query clamsmtpd.conf and hit the "Search" button From the "Search results" click over edit located at the right of clamsmtpd.conf.
Do like below:
# line 6: Make sure that the OutAddress: 10026 (leave it unmodified).
# line 22: uncomment and modify like this :
Listen: 127.0.0.1:10025
# line 28: uncomment
Header: X-Virus-Scanned: ClamAV using ClamSMTP
# line 34: uncomment
Action: drop
# line 22: uncomment and modify like this :
Listen: 127.0.0.1:10025
# line 28: uncomment
Header: X-Virus-Scanned: ClamAV using ClamSMTP
# line 34: uncomment
Action: drop
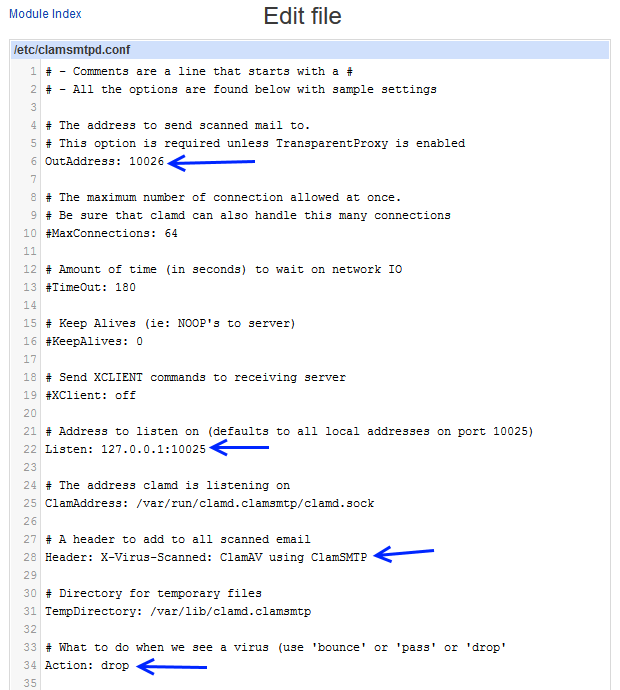
Click "Save and close" button.
Start clamsmtpd:
/etc/rc.d/init.d/clamsmtpd start
Start clamd.clamsmtp:
/etc/rc.d/init.d/clamsmtp-clamd start
Log in using Webmin this time and navigate to System > Bootup and Shutdown
Check the clamd, clamsmtp-clamd, clamsmtpd processes
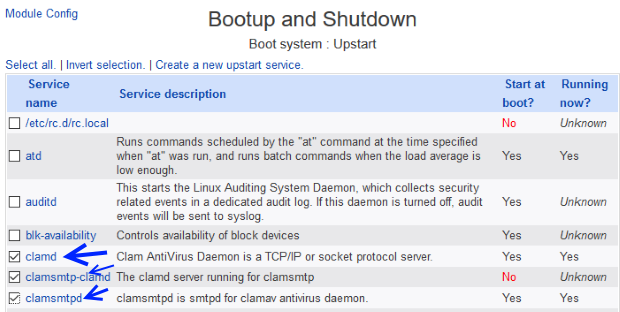
Click the "Start Now and on Boot" button.
Configure Postfix to use ClamAV
Navigate to Servers > Postfix Mail Server and click over the "General Options" icon.
Email content filter : scan:127.0.0.1:10025
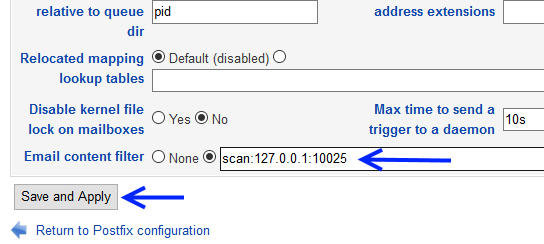
Click the "Save and apply" button.
Navigate to Servers > Postfix Mail Server and click over the "Edit Config Files" icon.
Select the file "/etc/postfix/master.cf" end press the "Edit" button
Now at the bottom of this file add this portion of code :
scan unix -       -       n       -       16       smtp
   -o smtp_data_done_timeout=1200
   -o smtp_send_xforward_command=yes
   -o disable_dns_lookups=yes
127.0.0.1:10026 inet n       -       n       -       16       smtpd
   -o content_filter=
   -o local_recipient_maps=
   -o relay_recipient_maps=
   -o smtpd_restriction_classes=
   -o smtpd_client_restrictions=
   -o smtpd_helo_restrictions=
   -o smtpd_sender_restrictions=
   -o smtpd_recipient_restrictions=permit_mynetworks,reject
   -o mynetworks_style=host
   -o smtpd_authorized_xforward_hosts=127.0.0.0/8
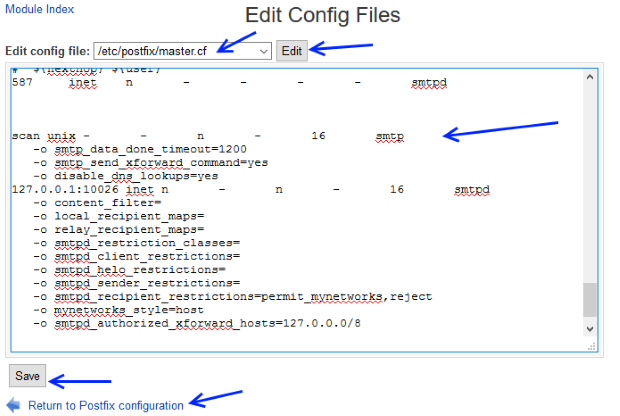
Click the "Save" button and click over "Return to Postfix configuration" link.
Hit "Reload Configuration" button
Stop and start Postfix
Install Cron Jobs
Log in via PuTTY and give the command :
yum install cronie
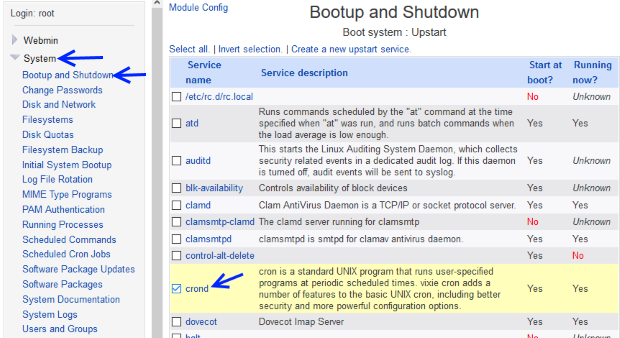
Now using Webmin navigate at System > Bootup and Shutdown.
Check crond and hit the "Start Now and On Boot" button.
Auto-Update ClamAV virus database using a Cron Job
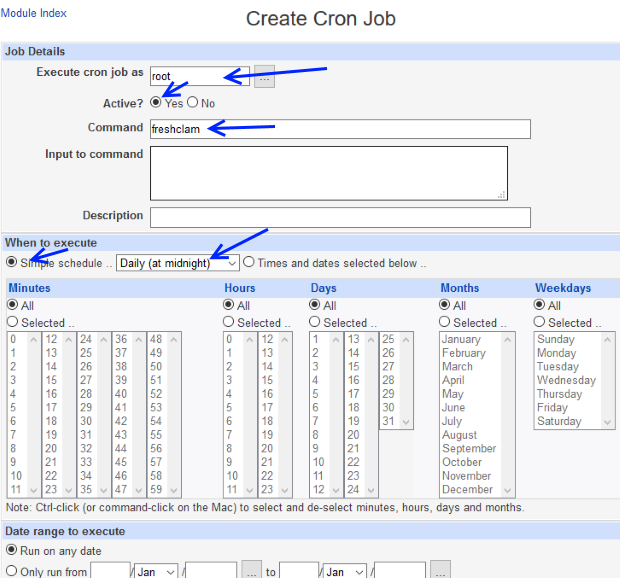
Navigate at System > Scheduled Cron JobsClick over the link called Create a new scheduled cron job.
Fill the "Create Cron Job" form like below :
Execute cron job as : root
Active?: Yes
Command : freshclam
Simple schedule ...: Checked Daily (at midnight)
Active?: Yes
Command : freshclam
Simple schedule ...: Checked Daily (at midnight)
Click the "Create" button.
Test ClamAV
Send an email at your account email@website1.comReceive and open the email using Thunderbird.
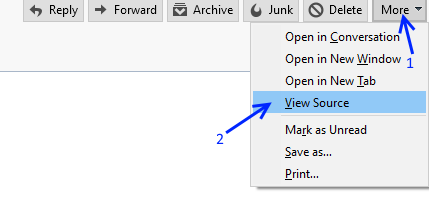
Click over More button and then select View Source.
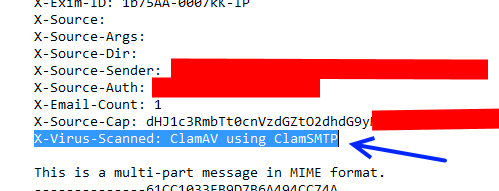
Over the source you should see the string : X-Virus-Scanned: ClamAV using ClamSMTP like the picture below:
Another test is to create an empty text file called "testantiv.txt" with the string:
X5O!P%@AP[4\PZX54(P^)7CC)7}$EICAR-STANDARD-ANTIVIRUS-TEST-FILE!$H+H*
This is a common Anti-Malware Testfile from European Institute for Computer Antivirus Research (Eicar).
A lot of email services if you try to send this file as attachment will trace if as false positive virus and won't permit you to send it.
In order to send this file at your account email@website1.com use some external service like: www.anonymousemail.me
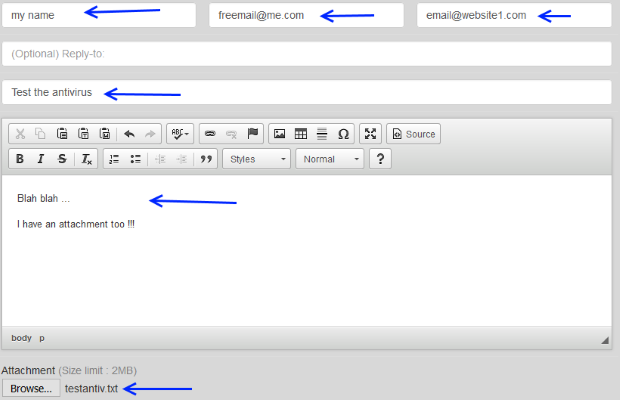
You should not receive that email.
Using Webmin navigate at System > System Logs.
Focus at the line /var/log/maillog and click View ...
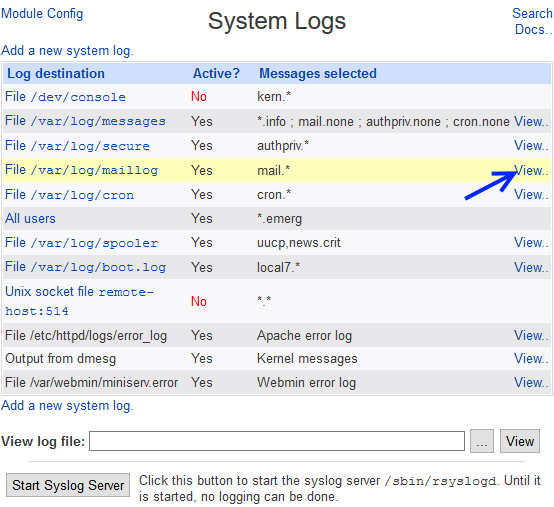
Only show lines with text: VIRUS Hit the "Refresh" button.

You should get: status=VIRUS:Eicar-Test-Signature
Your antivirus should be up and running !
In the next chapter we will find out how we can enable Web mail for our users using Usermin.
01-Introduction - 02-Installing Webmin - 03-Configure DNS - 04-Assign Nameservers - 05-Configure SFTP - 06-Setup Web server - 07-Let's Encrypt - 08-Setup Perl/CGI PHP - 09-Manage MySQL - 10-Setup Email server - 11-Setup SASL - 12-Setup Email accounts - 13-Email process - [[ 14-Email antivirus ]] - 15-Usermin - 16-Extras