


Configure a Dedicated Server with Webmin
Part 16 - Extras
01-Introduction - 02-Installing Webmin - 03-Configure DNS - 04-Assign Nameservers - 05-Configure SFTP - 06-Setup Web server - 07-Let's Encrypt - 08-Setup Perl/CGI PHP - 09-Manage MySQL - 10-Setup Email server - 11-Setup SASL - 12-Setup Email accounts - 13-Email process - 14-Email antivirus - 15-Usermin - [[ 16-Extras ]]We will see how we can add internal statistics for our web server.
Webalizer Installation
You can install Webalizer from Webmin interface.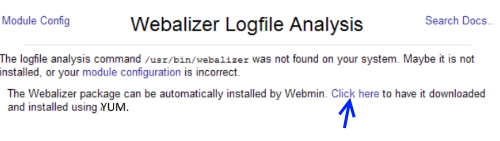
Webalizer: Configure general settings
Navigate at Servers > Webalizer Logfile Analysis.Click over the "Edit Global Options" button at the bottom.
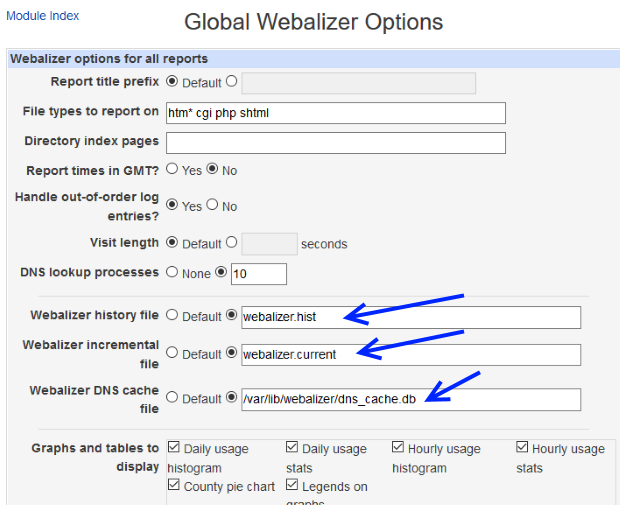
At the Global "Webalizer Options" form do like this :
Webalizer history file: webalizer.hist
Webalizer incremental file: webalizer.current
Webalizer DNS cache file: /var/lib/webalizer/dns_cache.db
Webalizer incremental file: webalizer.current
Webalizer DNS cache file: /var/lib/webalizer/dns_cache.db
We have to remove the absolute paths from history file and incremental file. The Webalizer DNS cache file can be left set to an absolute path, so that DNS information is shared between different reports.
Click the "Save" button at the bottom of the page.
Webalizer Global Stats
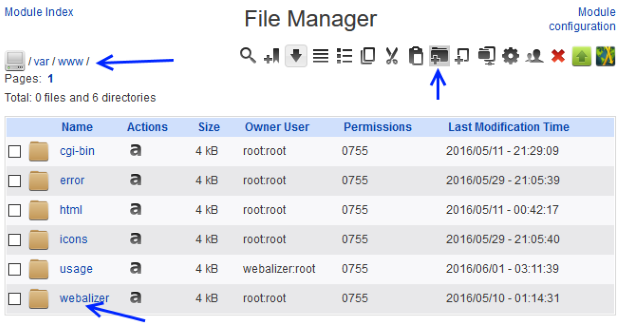
First of all let's set up our global stats.Navigate at Others > File Manager and go to var folder and then click at www folder.
Create a new folder called webalizer (/var/www/webalizer)
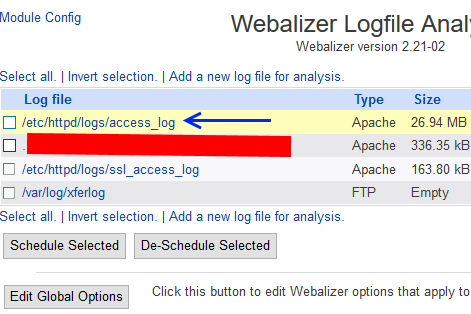
Global stats can be found at Servers > Webalizer Logfile Analysis
Click over the /etc/httpd/logs/access_log link.
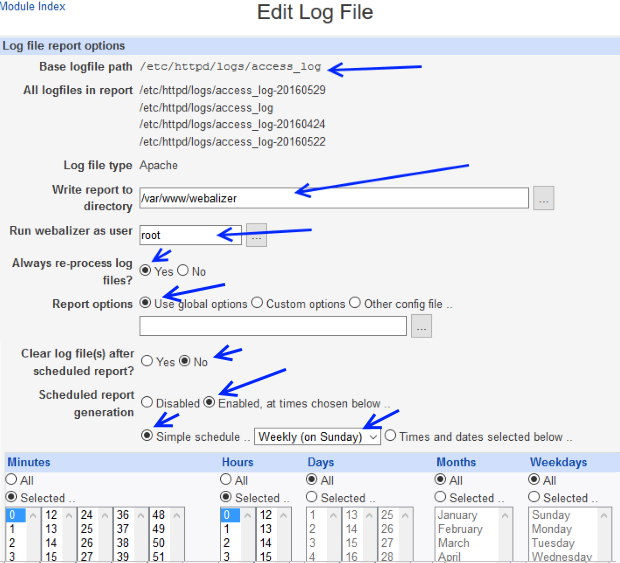
Fill the "Edit Log File" form like this:
Write report to directory : /var/www/webalizer
Run webalizer as user: root
Always re-process log files? Yes
Report options: Use global options
Clear log file(s) after scheduled report? No
Scheduled report generation: Enabled, at times chosen below ..
Simple schedule .. Weekly
Run webalizer as user: root
Always re-process log files? Yes
Report options: Use global options
Clear log file(s) after scheduled report? No
Scheduled report generation: Enabled, at times chosen below ..
Simple schedule .. Weekly
Hit the "Save" button.
In order to generate and see the global web stats just click at /etc/httpd/logs/access_log link.
In the "Edit Log File" page click at "Generate Report" button in order to generate the global stats.
Press "View Report" button in order to see the global web stats.
Webalizer Local - per site stats
In our example we will add stats for www.website1.comCreate using Filezilla (user: sftpwebsite1) the folders:
/home/sftpwebsite1/webalizer
/home/sftpwebsite1/logs
/home/sftpwebsite1/logs
Go to Servers > Apache Webserver.
Select the virtual server website1.com port 80 from the "Existing virtual hosts" list.
Click over the "Log Files" icon.
Fill the "Log Files" form of the website1.com virtual server like below:
At "Access log files" :
Write to: File..
File or program: /home/sftpwebsite1/logs/access_log
Write to: File..
File or program: /home/sftpwebsite1/logs/access_log
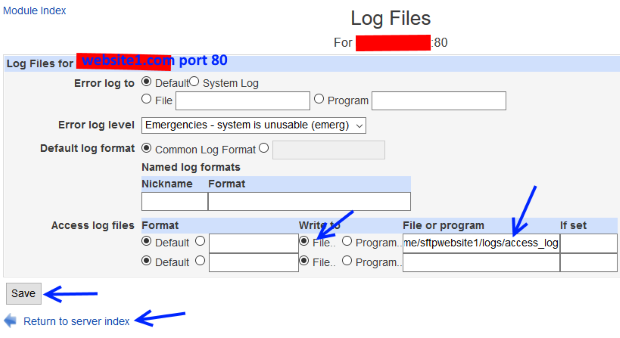
Hit the "Save" button.
Press the "Apply Changes" link at the top right.
Navigate at Server > Webalizer Logfile Analysis.
Click over the newly auto generated log link called /home/sftpwebsite1/logs/access_log
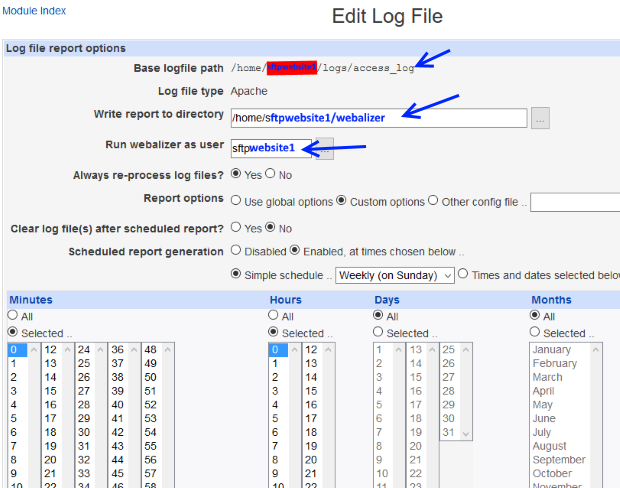
Fill the "Edit Log File" form like this:
Write report to directory /home/sftpwebsite1/webalizer
Run webalizer as user: sftpwebsite1
Always re-process log files? Yes
Report options: Custom options
Clear log file(s) after scheduled report? No
Scheduled report generation: Enabled, at times chosen below.
Simple schedule: Weekly
Run webalizer as user: sftpwebsite1
Always re-process log files? Yes
Report options: Custom options
Clear log file(s) after scheduled report? No
Scheduled report generation: Enabled, at times chosen below.
Simple schedule: Weekly
Press the "Save" button.
Now click again over the /home/sftpwebsite1/logs/access_log link.
Press "Edit Options" button located at the bottom of the "Edit Log File" page.
Fill the "Webalizer Report Options" like this:
Website hostname: www.website1.com
Webalizer history file: Default
Webalizer incremental file: Default
Webalizer DNS cache file: Default
Webalizer history file: Default
Webalizer incremental file: Default
Webalizer DNS cache file: Default

Click the "Save" button
Now press "Generate Report" and then press the "View completed report" link.
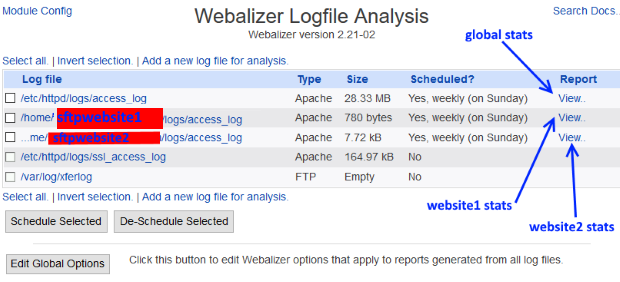
View Statistics
All you have to do in order to see the stats is to navigate at Server > Webalizer Logfile Analysis.From the "Webalizer Logfile Analysis" list select the "View.." link for the domain that you want to inspect.
Cron + PHP
In the Email-Antivirus section we have installed Cron Jobs and we have made a cron job in order to auto update our antivirus.Let's see how we can schedule PHP scripts.
As example we will make a PHP script that says the current uptime of our server.
The script will be scheduled every 5 minutes so we can see if we have downtimes.
Create an empty txt file and call it "up.php".
Copy and paste in that file the script below:
<?php

/*
uptime gives a one line display of the following information :
The current time,
how long the system has been running,
how many users are currently logged on,
and the system load averages for the past 1, 5, and 15 minutes.
*/

system("uptime");

?>
Now navigate at System > Scheduled Cron Jobs
Hit the link "Create a new scheduled cron job".
Fill the Create Cron Job like this:
Execute cron job as : select a user with email so you can see the result (ex : emailwebsite1)
The response of the script will go at email@website1.com
Active?: Yes
Command: /usr/bin/php -q /home/sftpwebsite1/www/up.php
Notice: if you do not want to receive cron results into the email of the user emailwebsite1 fill the command field like this:
/usr/bin/php -q /home/sftpwebsite1/www/up.php > /dev/null 2>&1
Description: Uptime for website1.com
When to execute : Times and dates selected below ..
Minutes: Selected(using CTRL key) 0,5,10,15,20,25,30,35,40,45,50,55
Hours: All
Days: All
Months: All
Weekdays: All
Date range to execute: Run on any date
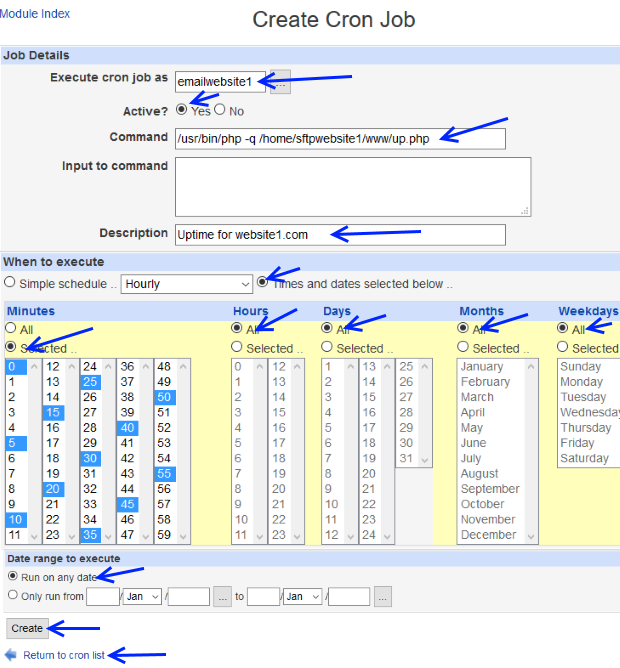
Hit the "Create" button.
Your PHP cron job should work.
Webmin Backup
Once you have configured your dedicated server it is always a good option to backup your configuration files.To do so navigate at Webmin > Backup Configuration Files.
Click the "Backup now" tab.
Modules to backup: example : Apache Webserver Download in browser.
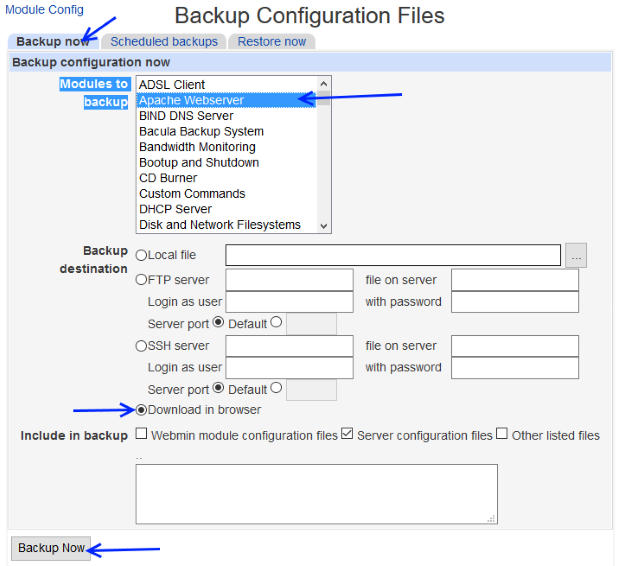
Click over the "Back up now" button.
I suggest to backup individually the following modules:
- Apache Webserver
- BIND DNS Server
- Bootup and Shutdown
- Dovecot IMAP/POP3 Server
- Linux Firewall
- MySQL Database Server
- PHP Configuration
- Postfix Mail Server
- Procmail Mail Filter
- SSH Server
- Scheduled Cron Jobs
- SpamAssassin Mail Filter
- Usermin Configuration
- Users and Groups
- Webalizers Logfile Analysis
- Webmin Configuration
- Webmin Servers Index
- Webmin Users
Use the "Restore now" tab in order to restore your dedicated server.
With this we have finished our server configuration!
Thanks for your attention.
01-Introduction - 02-Installing Webmin - 03-Configure DNS - 04-Assign Nameservers - 05-Configure SFTP - 06-Setup Web server - 07-Let's Encrypt - 08-Setup Perl/CGI PHP - 09-Manage MySQL - 10-Setup Email server - 11-Setup SASL - 12-Setup Email accounts - 13-Email process - 14-Email antivirus - 15-Usermin - [[ 16-Extras ]]