Configure a Dedicated Server with Webmin
Part 05 - SFTP Setup
01-Introduction - 02-Installing Webmin - 03-Configure DNS - 04-Assign Nameservers - [[ 05-Configure SFTP ]] - 06-Setup Web server - 07-Let's Encrypt - 08-Setup Perl/CGI PHP - 09-Manage MySQL - 10-Setup Email server - 11-Setup SASL - 12-Setup Email accounts - 13-Email process - 14-Email antivirus - 15-Usermin - 16-ExtrasThere are three secure File Transfer Protocols used to transfer computer files between a client and server.
- SCP (in SSH 1.x)
- SFTP (in SSH2)
- FTPS
The secured version of FTP is named FTPS also called "SSL/TLS protocol under FTP".
SFTP and FTPS are both very secure with strong authentication options but SFTP is technologically superior to FTPS.
In this ebook we will focus only at SFTP.
Set up SFTP Server
Log in using PuTTY.Now from the console send this command :
find /usr -name sftp-server
This command finds the exact location of SSH.
In our case we got this response :
/usr/libexec/openssh/sftp-server

Once we know the SSH location we need to add this shell in our shells list.
We do this by sending this command:
sudo sh -c "echo /usr/libexec/openssh/sftp-server >> /etc/shells"
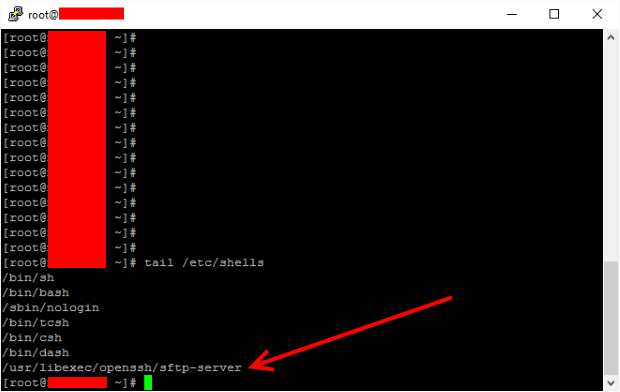
Verify that the shell has been added like this :
tail /etc/shells
You should get at the last line :
/usr/libexec/openssh/sftp-server
Create a new SFTP user
Now Login to WebminGo to System > Users and Groups
Click the Create a new user link.
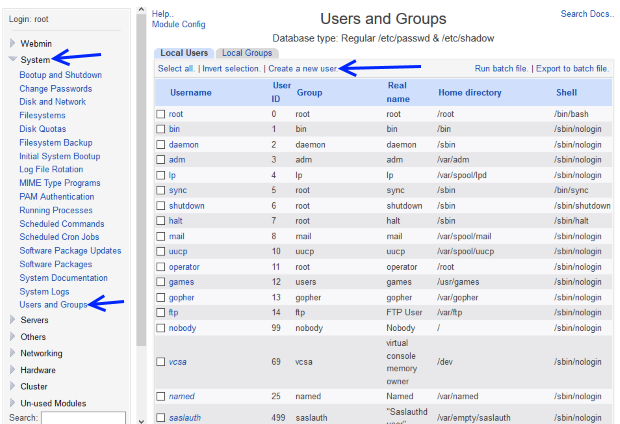
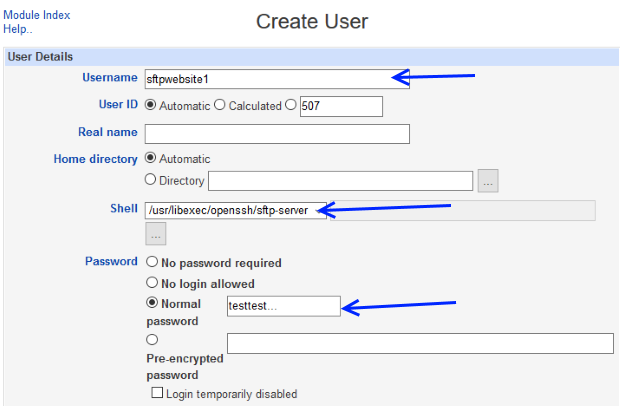
In the Create User page fill like this :
Username: sftpwebsite1
User ID: Automatic
Home directory: Automatic
Shell : /usr/libexec/openssh/sftp-server
Password : click on Normal password and choose a password.
You can leave all other settings as-is.
User ID: Automatic
Home directory: Automatic
Shell : /usr/libexec/openssh/sftp-server
Password : click on Normal password and choose a password.
You can leave all other settings as-is.
Finally click the "Create" button located at the bottom of the page.
The new sftpwebsite1 should appear at the bottom of the user-list.
Connect at the SFTP server
In order to connect and transfer files via SFTP you need a STFP Client.We are going to use FileZilla Client.
FileZilla works under Windows, Linux and Mac OS X.
Launch FileZilla
Click : File > Site manager.
Click at "New site" button
Host : 111.111.111.111 (your dedicated IP address)
Port : 22
Protocol : SFTP
Logon type : Normal
User : sftpwebsite1
Password : sftpwebsite1 user's password
Hit the "Connect" button Port : 22
Protocol : SFTP
Logon type : Normal
User : sftpwebsite1
Password : sftpwebsite1 user's password
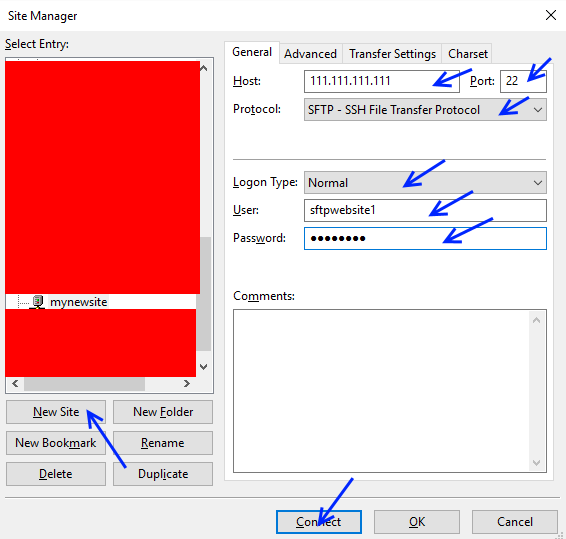
You should connect successfully ! Using FileZilla create a "www" folder at the root of the directory.
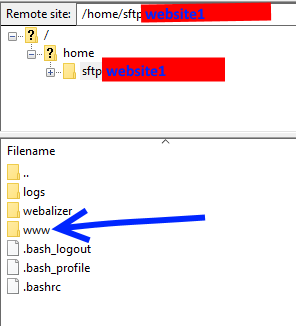
Jail SFTP user into their directories (optional)
Users with shell set to sftp-server have access to your server's entire filesystem.If we want a certain user to be jailed at his directory we have to do this procedure:
From Webmin navigate to Servers > SSH Server
Press the "Edit Config Files" icon.
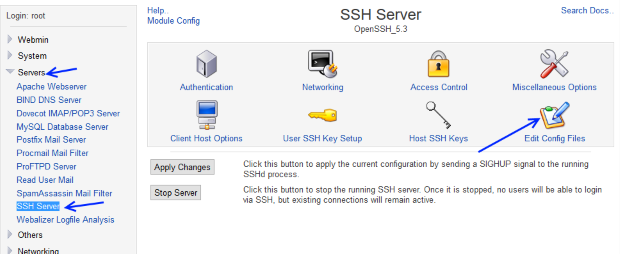
Select as "Edit config file:" /etc/ssh/sshd_config
Hit the "Edit" button.
Do this modification :
#Subsystem sftp /usr/lib/openssh/sftp-server
Subsystem sftp internal-sftp
Subsystem sftp internal-sftp
Write at the bottom of the same file :
Match user sftpwebsite1
# The following two directives force ben_files to become chrooted
# and only have sftp available. No other chroot setup is required.
ChrootDirectory /home/sftpwebsite1
ForceCommand internal-sftp
# For additional paranoia, disallow all types of port forwardings.
AllowTcpForwarding no
GatewayPorts no
X11Forwarding no
# and only have sftp available. No other chroot setup is required.
ChrootDirectory /home/sftpwebsite1
ForceCommand internal-sftp
# For additional paranoia, disallow all types of port forwardings.
AllowTcpForwarding no
GatewayPorts no
X11Forwarding no
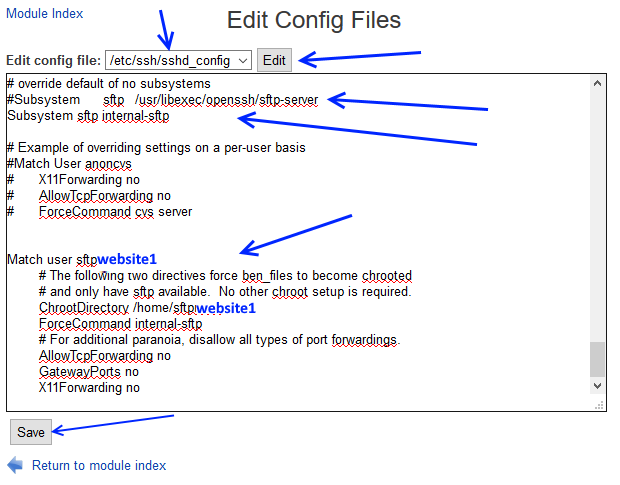
Hit the "Save" button.
Now always using Webmin go to :
Others > File Manager
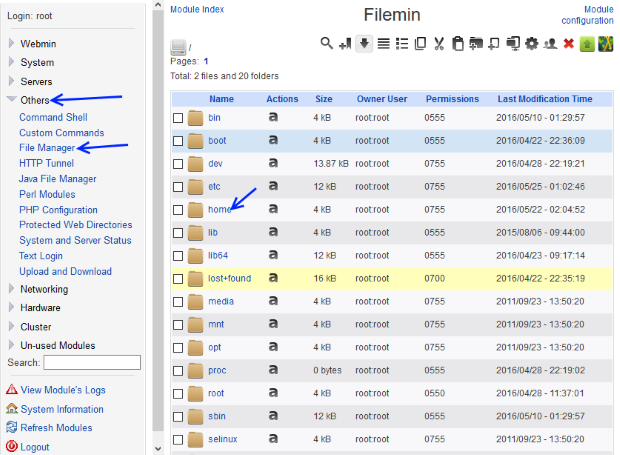
Navigate to the folder /home and check the sftpwebsite1 folder.
Click over the Chown Selected icon and use
User name : root
Group name : root
Unselect recursive
Now hit the Chmod Selected icon
set Permissions : 0755
User name : root
Group name : root
Unselect recursive
Now hit the Chmod Selected icon
set Permissions : 0755
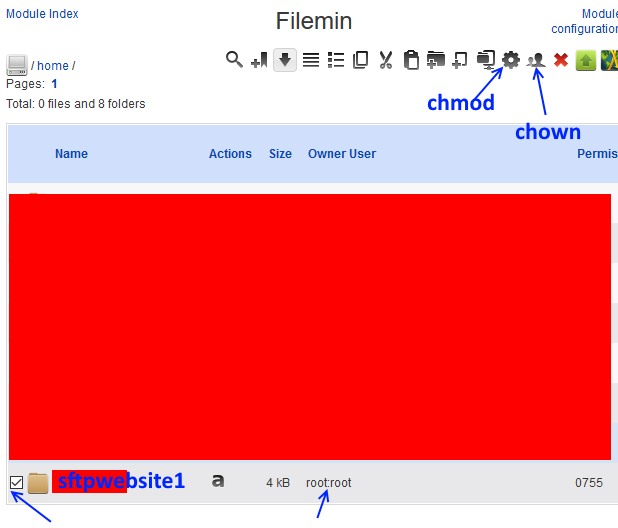
Make sure that the folder :
/home/sftpwebsite1/www is owned by sftpwebsite1:sftpwebsite1
Otherwise click over the Chown Selected icon and modify the ownership of this folder.
This way the user sftpwebsite1 can upload (write) his content.
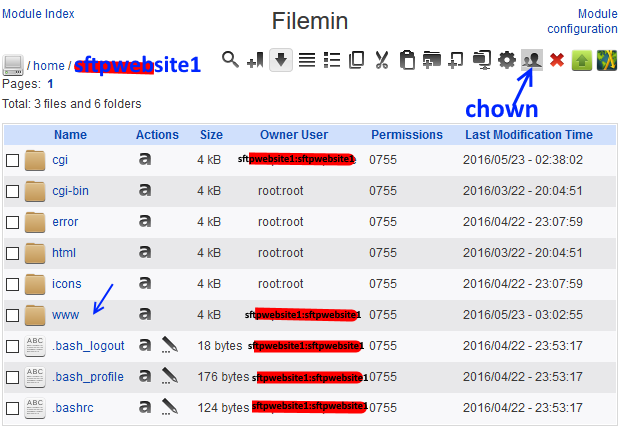
Now go to :
Servers > SSH Server
Click the "Stop Server" button and then click the
"Start Server" button in order to update these options.
By doing this procedure the user sftpwebsite1 will be jailed into his home folder /home/sftpwebsite1/ and he can not see the other SFTP users folders.
Also he can upload files into his "www" folder.
In the next section we will set up our web server.
01-Introduction - 02-Installing Webmin - 03-Configure DNS - 04-Assign Nameservers - [[ 05-Configure SFTP ]] - 06-Setup Web server - 07-Let's Encrypt - 08-Setup Perl/CGI PHP - 09-Manage MySQL - 10-Setup Email server - 11-Setup SASL - 12-Setup Email accounts - 13-Email process - 14-Email antivirus - 15-Usermin - 16-Extras